How To Install and Configure FTP Server with VSFTPD on Debian 11 Bullseye
10 min read
In this tutorial we will see how to install and configure ftp server with vsftpd on Debian 11 Bullseye. “vsftpd” is an open source and free FTP Server for Linux Operating Systems. It is one of the most robust, secure and popular FTP Server tool. The vsftpd FTP Server is one of the most trusted applications among the Linux professionals. The official website of vsftpd FTP Server claims that the security, stability and performance is the key points due to which it has gained much popularity among the Linux users.
As claimed by the community of developers of vsftpd ftp server, some of the features of vsftpd Server include.
- bandwidth throttling
- per user configuration
- virtual users
- Standalone or inetd operation,
FTP is a short form for file transfer protocol. In the past normally insecure files transfers using FTP were used for transfer of files and documents between servers and clients. But in the modern days the old FTP is changed to more secure, stable and faster FTP applications like vsftpd, scp etc. In my opinion vsftpd is the best choice for transferring important files and data between clients and server systems. Currently there are number of Linux distribution that includes vsftpd as the default FTP Server in their Linux distribution.
Prerequisites for installation of vsftpd on Debian 11 Bullseye
Following are the prerequisites for installing vsftpd on Debian 11 Bullseye operating system.
- First, we will require a Desktop or a laptop computer with pre-installed Debian 11 Bullseye operating system. If you need to install Debian 11 Bullseye on your system then you can follow our guide to installing Debian 11 Bullseye. The link to the tutorial is given below.
| How to Install Debian 11 Bullseye Step by Step With Screenshots |
- We will also require a non root user with sudo privileges with passwords for the installation of the application.
- Additionally, we will need a stable and fast internet connection for downloading and installing the vsftpd ftp application on our computer.
Installation of vsftpd FTP Server on Debian 11 Bullseye
First update your system before the start of the installation. To update your system open the terminal window and issue the following command as given below.
sudo apt-get updatesudo apt-get upgradeThe vsftpd FTP Server package is already available in the default package repository of the Debian 11 Bullseye operating system. Therefore use the apt command of the Debian 11 Bullseye to install the vsftpd FTP Server. To install the application issue the following command in the terminal window.
sudo apt-get install vsftpdThe above command will prompt to start the installation of the application. On the affirmative response the installation will start and will complete in very short time. During the installation the vsftpd Server creates a initial configuration file. The location of this configuration file “vsftpd.conf” is the /etc folder.
Before making any changes, the backup of the original configuration file of vsftpd should be taken. To do this copy the original configuration file with a new name. To do this issue the following command in the terminal window.
sudo cp /etc/vsftpd.conf /etc/vsftpd.conf.backupConfigure the Firewall on Debian 11 Bullseye for vsftpd FTP Server
Now we have to configure the firewall so that the FTP traffic can pass through the firewall. First check whether ufw firewall is installed and started on your system. Issue the following command in the terminal windows.
sudo ufw statusIf the output of the above command shows that ufw firewall is installed but is currently disabled as shown below.
sudo ufw statusThe output of the above command will be similar to the given below figure.
| Status: inactive |
Then issue the following command in the terminal window.
sudo ufw enablesudo service ufw restartTo allow OpenSSH and FTP traffic through the firewall issue the following command in the terminal window in the given order.
sudo ufw allow OpenSSHsudo ufw allow 20/tcpsudo ufw allow 21/tcpsudo ufw allow 990/tcpsudo ufw allow 10000:20000/tcpNow again issue the ufw status command in the terminal window as shown below.
sudo ufw statusThe output of the above command will be similar as given below.
| sudo ufw status Status: active To Action From — —— —- OpenSSH ALLOW Anywhere 20/tcp ALLOW Anywhere 21/tcp ALLOW Anywhere 990/tcp ALLOW Anywhere 10000:20000/tcp ALLOW Anywhere OpenSSH (v6) ALLOW Anywhere (v6) 20/tcp (v6) ALLOW Anywhere (v6) 21/tcp (v6) ALLOW Anywhere (v6) 990/tcp (v6) ALLOW Anywhere (v6) 10000:20000/tcp (v6) ALLOW Anywhere (v6) |
Configuring FTP Directory and FTP User in vsftpd Server
If you have your website hosted on your web server and you want to upload and download files from the website folder. Then you have to configure this directory in vsftpd server. In addition to this you should also create a separate ftp user for file transfer job. Now we will see how to create out FTP directory and FTP user.
First we will create our FTP User with the name ftpuser and give FTP access to it. To create a new FTP user issue the following command in the terminal windows as shown below.
sudo adduser ftpuserThe output of the above command will be similar to the figure given below.
| sudo adduser ftpuser Adding user `ftpuser’ … Adding new group `ftpuser’ (1001) … Adding new user `ftpuser’ (1001) with group `ftpuser’ … Creating home directory `/home/ftpuser’ … Copying files from `/etc/skel’ … New password: Retype new password: passwd: password updated successfully Changing the user information for ftpuser Enter the new value, or press ENTER for the default Full Name []: FTP User Room Number []: Work Phone []: Home Phone []: Other []: Is the information correct? [Y/n] Y |
As shown in the above figure enter and confirm the password and necessary information as you like and create the new ftpuser.
Now we will setup a directory structure on the server for transferring files and provide the ftpuser access to the directory. Let us create this folder with the name of ftp inside the /home/ftpuser folder. We will also give ownership to ftpuser on this directory. To create a new FTP directory and provide the ownership to the ftpuser issue the following command in the terminal window in the given sequence.
sudo mkdir /home/ftpuser/ftpsudo chown nobody:nogroup /home/ftpuser/ftpsudo chmod a-w /home/ftpuser/ftpNow we will create a folder where the files can be uploaded and we will also provide ownership to our ftpuser on this folder. To do this issue the following command in the terminal windows as shown below in the given sequence.
sudo mkdir /home/ftpuser/ftp/ftpdocssudo chown ftpuser:ftpuser /home/ftpuser/ftp/ftpdocsNow we have successfully created the FTP directory structure and our ftp user. Also we have given the necessary permissions to our ftp user for transfer of files in this directory.
Configure vsftpd Server
Now we will make the necessary changes in the configuration file vsftpd.conf to configure our vsftpd FTP server. To do this open the vsftpd.conf file in your favorite text editor. We are using nano editor. Issue the following command in the terminal window.
sudo nano /etc/vsftpd.confMake the following changes as given below in the vsftpd.conf file.
| listen=NO listen_ipv6=YES anonymous_enable=NO local_enable=YES write_enable=YES local_umask=022 dirmessage_enable=YES use_localtime=YES xferlog_enable=YES connect_from_port_20=YES chroot_local_user=YES secure_chroot_dir=/var/run/vsftpd/empty pam_service_name=vsftpd pasv_enable=Yes pasv_min_port=10000 pasv_max_port=11000 user_sub_token=$USER local_root=/home/$USER/ftp/ftpdocs userlist_enable=YES userlist_file=/etc/ vsftpd.userlist userlist_deny=NO allow_writeable_chroot=YES |
Make the changes in the configuration file as shown in the figure above and save and exit the text editor.
Now create a userlist file as mentioned in the configuration file above and add our ftp user in the userlist file. When the userlist_deny is set to NO in the configuration file then the users in the list are allowed and when it is set to YES then the users in the userlist are denied FTP permission. Now to create userlist file and add out ftpuser in the userlist file, issue the following command in the terminal window.
sudo echo "ftpuser" | sudo tee -a /etc/vsftpd.userlistTo verify that the file is created and user is added in the userlist file issue the following command in the terminal window.
sudo cat /etc/vsftpd.userlistThe output of the above command will be similar to the given below.
root@pentarock:~# sudo cat /etc/vsftpd.userlist ftpuser |
Now restart the vsftpd FTP Server so that the configuration changes may take effect. To restart the vsftpd service issue the following command in the terminal window.
sudo systemctl restart vsftpdNow we have successfully installed and configured vsftpd server. Now we can test our vsftpd server by connecting to it from out ftpuser.
Verify the FTP Connection
To test our vsftpd FTP Server we have created a test file “ftptest.txt” in the ftpdocs folder. Now we will transfer the same file to a Windows 10 computer using the ftp command in the command window of Windows 10 Operating System. Issued the ftp command and the output of the command are shown below.
| C:\Users\Pentarock>ftp 192.168.1.25 Connected to 192.168.1.25. 220 (vsFTPd 3.0.3) 200 Always in UTF8 mode. User (192.168.1.25:(none)): ftpuser 331 Please specify the password. Password: 230 Login successful. ftp> cd ftpdocs 250 Directory successfully changed. ftp> dir 200 PORT command successful. Consider using PASV. 150 Here comes the directory listing. -rw-r–r– 1 0 0 74 Sep 05 11:00 ftptest.txt 226 Directory send OK. ftp: 72 bytes received in 0.00Seconds 36.00Kbytes/sec. ftp> get ftptest.txt 200 PORT command successful. Consider using PASV. 150 Opening BINARY mode data connection for ftptest.txt (74 bytes). 226 Transfer complete. ftp: 74 bytes received in 0.00Seconds 74000.00Kbytes/sec. ftp> |
The above output shows that our vsftpd server is installed correctly and we are now able to transfer files from our server.
The above file transfers are insecure. In the insecure FTP Servers decrypted data is transferred. Therefore now we will secure our vsftpd server. To provide the encryption we will enable TLS/SSL on our vsftpd FTP Server. However, we will use openssl to create SSL certificate. Additionally we will create a certificate with the validity of 90 days. We will also add a private 2048 bit RSA key. To create the SSL certificate issue the following command in the terminal window.
sudo openssl req -x509 -nodes -days 90 -newkey rsa:2048 -keyout /etc/ssl/private/vsftpd.pem -out /etc/ssl/private/vsftpd.pemThe output of the above command will be similar to the shown below.
| sudo openssl req -x509 -nodes -days 90 -newkey rsa:2048 -keyout /etc/ssl/private/vsftpd.pem -out /etc/ssl/private/vsftpd.pem Generating a RSA private key ………………………………..+++++ ………………………..+++++ writing new private key to ‘/etc/ssl/private/vsftpd.pem’ —– You are about to be asked to enter information that will be incorporated into your certificate request. What you are about to enter is what is called a Distinguished Name or a DN. There are quite a few fields but you can leave some blank For some fields there will be a default value, If you enter ‘.’, the field will be left blank. —– Country Name (2 letter code) [AU]:IN State or Province Name (full name) [Some-State]:UP Locality Name (eg, city) []:GZB Organization Name (eg, company) [Internet Widgits Pty Ltd]:Pentarock Organizational Unit Name (eg, section) []:Blog Common Name (e.g. server FQDN or YOUR name) []: Email Address []:contact@pentarock.in |
There are many fields to enter during the creation of the certificate but you can leave some of them blank if you wish so.
Now open the vsftpd configuration file again in your favorite text editor. Issue the following command to open the file in the nano text editor.
sudo nano /etc/vsftpd.confScroll down to the end of the configuration file. There you will see the following lines.
| rsa_cert_file=/etc/ssl/certs/ssl-cert-snakeoil.pem rsa_private_key_file=/etc/ssl/private/ssl-cert-snakeoil.key Comment out these lines and add two new lines below these lines as shown in the figure below. # rsa_cert_file=/etc/ssl/certs/ssl-cert-snakeoil.pem # rsa_private_key_file=/etc/ssl/private/ssl-cert-snakeoil.key rsa_cert_file=/etc/ssl/private/vsftpd.pem rsa_private_key_file=/etc/ssl/private/vsftpd.pem |
Now add the following lines in the vsftpd FTP Server configuration file as given below.
ssl_enable=YES
allow_anon_ssl=NO
force_local_data_ssl=YES
force_local_logins_ssl=YES
ssl_tlsv1=YES
ssl_sslv2=NO
ssl_sslv3=NO
require_ssl_reuse=NO
ssl_ciphers=HIGH
Now restart the vsftpd Server by issuing the following command in the terminal window.
sudo systemctl restart vsftpdFurthermore, if we will try to connect to our server in insecure mode the output of the command will be similar to the shown below.
C:\Users\Pentarock>ftp 192.168.1.25
| Connected to 192.168.1.25. 220 (vsFTPd 3.0.3) 200 Always in UTF8 mode. User (192.168.1.25:(none)): ftpuser 530 Non-anonymous sessions must use encryption. Connection closed by remote host. |
Test TLS Connection using Filezilla client Installed on a Windows 10 Computer
Now we will test our vsftp server using Filezilla client which supports and uses TLS encryption. You can do so with any other ftp client application that supports TLS/SSL encryption. There are many FTP client applications are available that support TLS/SSL encryption.
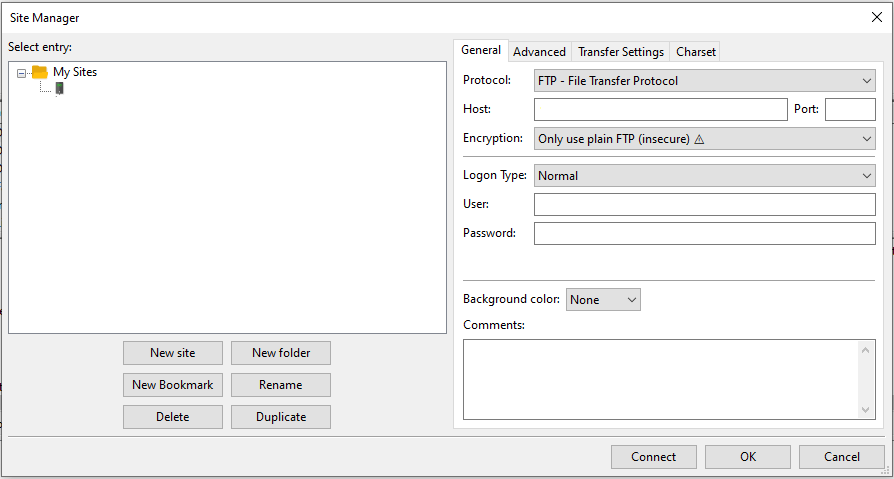
Now open FileZilla Client and Create a new connection to the server as shown in the image below.

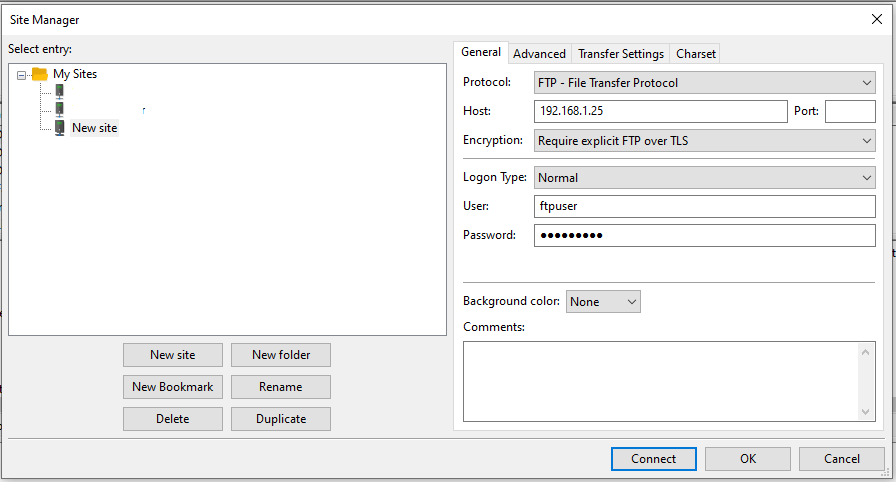
Now create a new connection as shown below. We have created new connection “New Site” with the option “Require Explicit FTP Over TLS” selected.

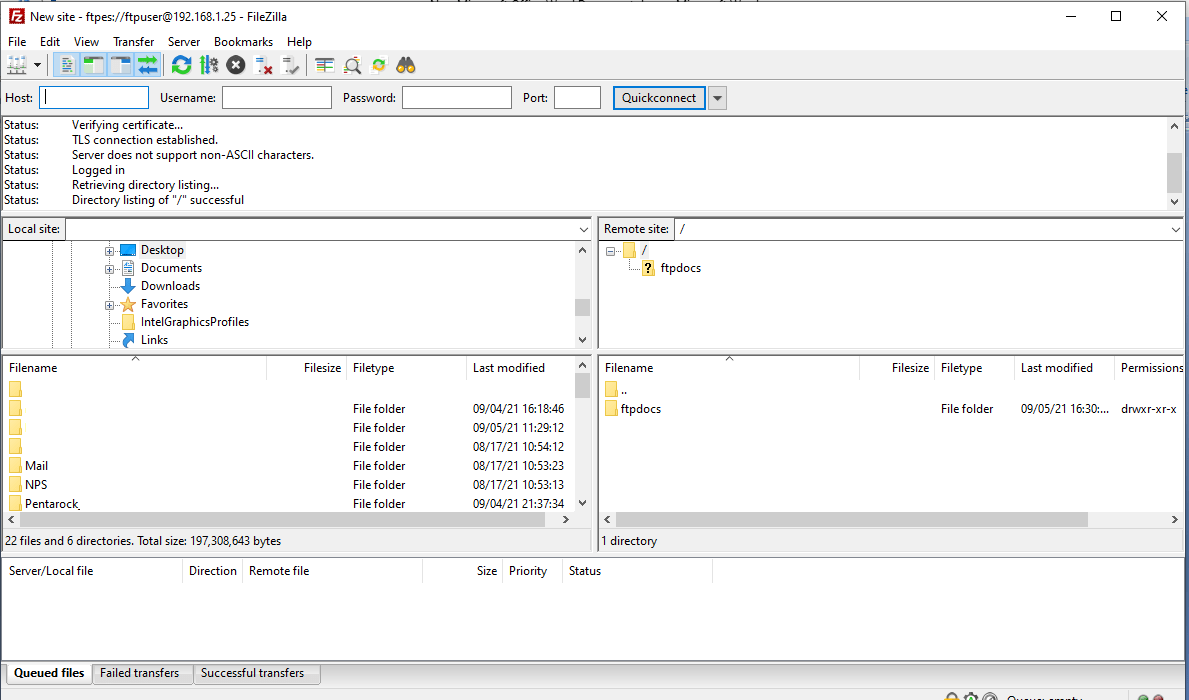
Now connect to the server as shown in the figure below.

Now as shown in the above figure that we have successfully installed and configured the vsftpd FTP Server on Debian 11 Bullseye operating system. Enjoy!


