How to Install Debian 11 Bullseye Step by Step With Screenshots
In this tutorial we will learn how to install Debian 11 Bullseye step by step with screenshots. However, the code name of Debian 11 is Bullseye. Moreover, the predecessor to Debian 11 Bullseye, the Debian 10 Buster was released on 6th July 2019. After long time of about 25 months Debian 11 Bullseye was released on 14th August, 2021. It took more than 2 years for development and rigorous testing of the new version. Additionally, Debian 11 is a long term support (LTS) version and will have a support for next five years. More than 70 percent of packages of Debian 10 Buster are updated to newer versions for Debian 11 Bullseye. Also, some of the newer versions of packages of Desktop environments are:
- GNOME 3.38 Desktop Environment
- KDE Plasma 5.20 Desktop Environment
- LXDE 11 Desktop Environment
- Mate 1.24 Desktop Environment
- Xfce 4.16 Desktop Environment
- LXQt 0.16 Desktop Environment
In addition to above there is a long list of the default applications like Apache 2.4.48, BIND DNS Server 9.16, Calligra 3.2, Cryptsetup 2.3, Emacs 27.1, GIMP 2.10.22, GNU Compiler Collection 10.2, GnuPG 2.2.20, Inkscape 1.0.2, LibreOffice 7.0, MariaDB 10.5, OpenSSH 8.4p1, Perl 5.32, PHP 7.4, Vim 8.2 and lots of other applications have been upgraded to newer versions. Debian 11 Bullseye also has a newer kernel version 5.10.
However, now we will see the prerequisites for install Debian 11 Bullseye Operating System.
Prerequisites for Install Debian 11 Bullseye Operating System
- Firstly we will require a Desktop or a Laptop computer for installation of Debian 11 Bullseye Desktop or Server Edition.
- Next, At least 1 GB of RAM is required in the computer system. The recommended RAM is 2 GB for better performance of the Operating System.
- A recommended 10 GB of Hard Disk Space is needed for the installation of Debian 11 Bullseye.
- A DVD and USB Drive in the computer system is required to boot from external Disk.
- A blank DVD or USB media for creation of the startup installer disk from the downloaded ISO installer file.
- A stable and fast interment connection for downloading Debian 11 ISO installer file from the official website. We will also need internet for updating the operating system after the installation is complete.
Download Installer ISO File for Debian 11 Bullseye
Moreover, we have to download the installer ISO file from the official website of Debian 11 Bullseye. Following is the URL of the official download page of Debian 11 Bullseye. First navigate to the given URL and download the installer ISO file.
| Link to the Official Website of Debian 11 Bullseye for ISO Installer File Download |
Once the download is completed we will create a startup installer disk. Here we will see how to create a USB installer Disk from the downloaded installer ISO file.
Creation of Installer Media from Downloaded ISO File
Furthermore, there are a number of application tools are available for the creation of startup disk from the ISO files. These application tools are for all the operating systems ranging from windows, MacOS and Linux.
If you are a Linux user and have some experience in Linux then you do not need any application tool for the creation of startup disk. Just open the terminal window and use the DD command of Linux to create a startup disk from the ISO file.
However, creating installer media by using installer media creation tools is easier. Some of the most popular startup disk creator tools are Startup Disk Creator, UNetbootin and Rufus. You can use any of these tools to create the installer media. The installations of the above application tools are quite straight forward and easy. Just download the application installer from their respective official website and install them on your system. A link to the official website of UNetbootin and Rufus startup disk creator is given below for downloading the application.
| Link to the Official Website of UNetbootin for Application Download |
| Link to the Official Website of Rufus for Application Download |
Backup Data before Installing the New Operating System Debian 11 Bullseye
If you are willing to install the new Debian on your existing Desktop or Laptop computer, then take complete backup of your personal data. The hard disk will be initialized before the installation of the new Debian 11 operating system.
Start Installing Debian 11 Bullseye on your Desktop or Laptop Computer
To install the new Debian 11 first change the first boot device of your computer system to DVD and USB Disk Drive as the case may be. To change the first boot device to USB/DVD Disk Drive restart the computer and go to the BIOS Setup and change the boot priority.
Next, insert the installer media in the system and restart the system and allow it to boot from the external startup disk.
Debian 11 Installer Menu Screen
After the booting is complete the following Debian GNU Linux Installer Menu BIOS Mode will be displayed on the screen. This display screen will show all the available installation options of the Debian 11 Bullseye operating System. Below given is an image of this display screen.
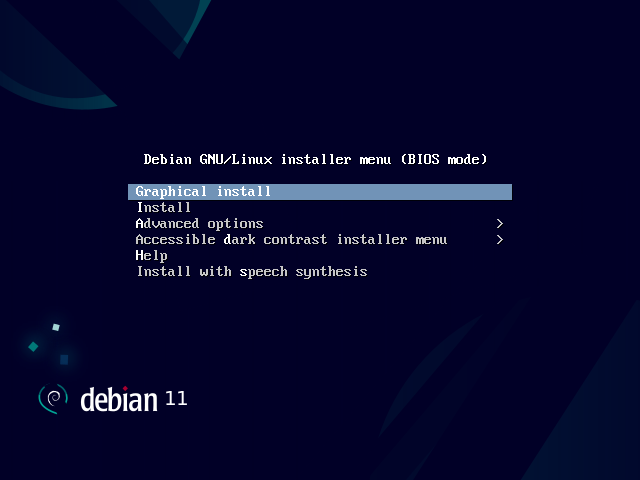
Select the Graphical Install method in the installer menu and press enter key on the keyboard to continue to the next step.
Debian 11 Language Selection Screen
The next screen will be language selection screen. In this screen a list of available supported languages will be displayed. An image of the displayed screen is shown below.
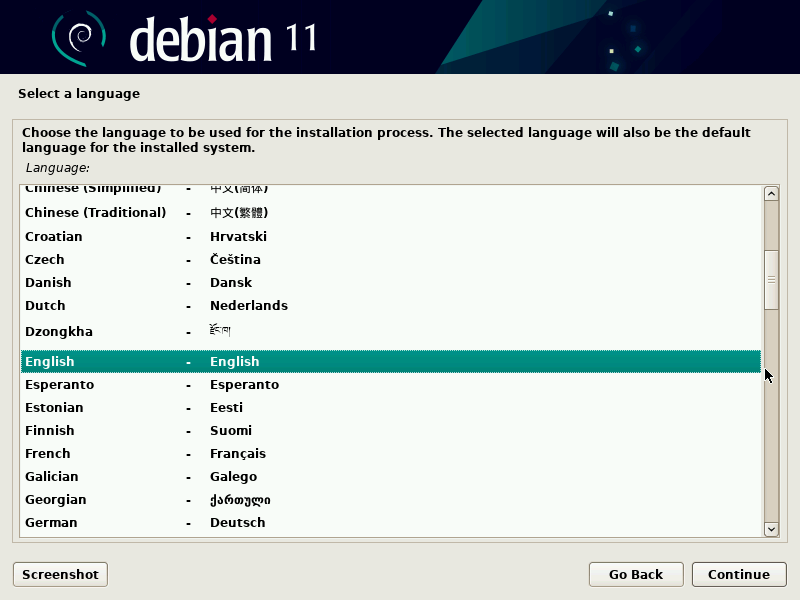
In the above display screen select the appropriate language of your choice. The complete installation process will then proceed in the selected language. However you can change the system language according to your requirement after the installation of the operating system. Click the continue button on the bottom right of the screen to proceed to the next step.
Debian 11 Location (Time Zone) Selection Screen
The next Screen will offer you to select the location. A list of locations generally country names will be displayed in this screen. Your location is used to set the correct tome zone in your computer system. An image of the location selection screen is displayed below.
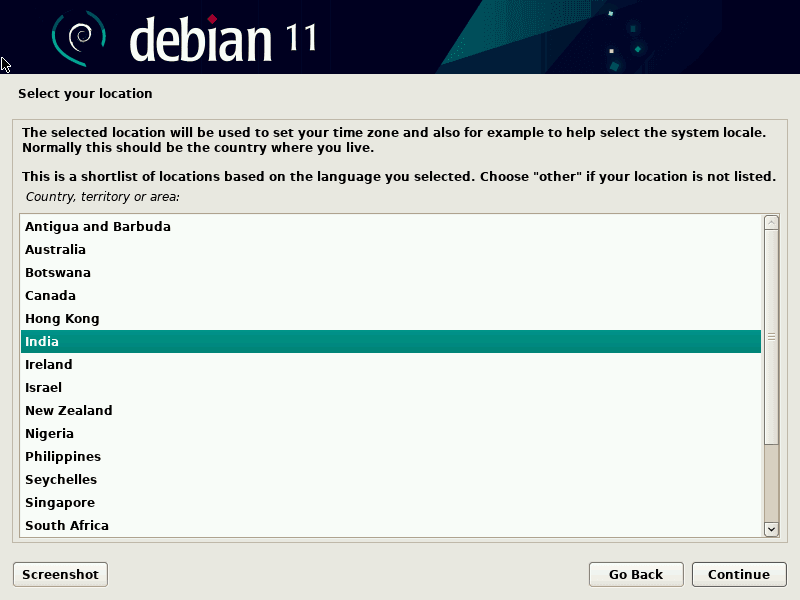
Select the appropriate location from the above screen. If your location is not given in the list then choose the other option from the list. Then click continue to proceed to the next step.
Debian 11 Keyboard Configuration Selection Screen
The next display screen is for the selection and configuration of the keyboard. Below given is an image of this display screen.
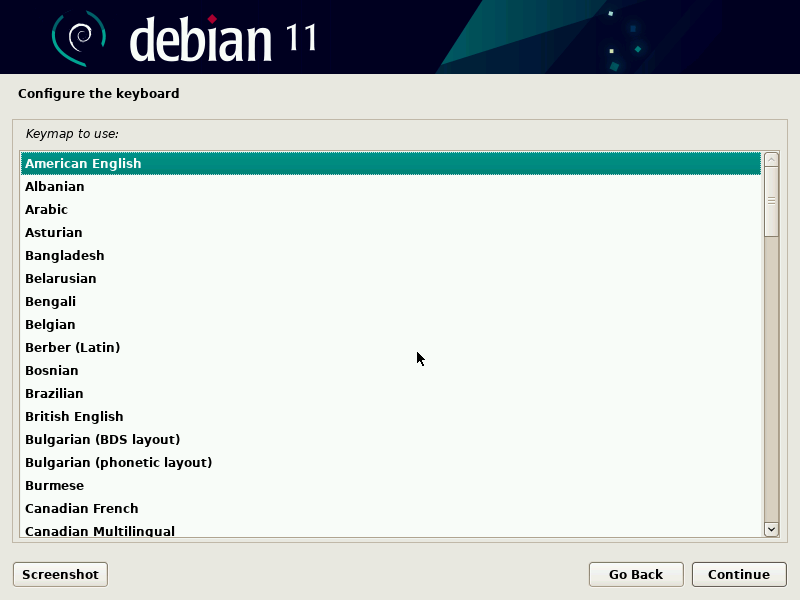
Next we will get a list of available keyboard layouts on the screen. Select the appropriate keyboard layout and click on the continue button to proceed to the next step.
Network Configuration Screen (Select Host name)
The next screen will be to configure the network and select host name. Below given is an image of this display screen.
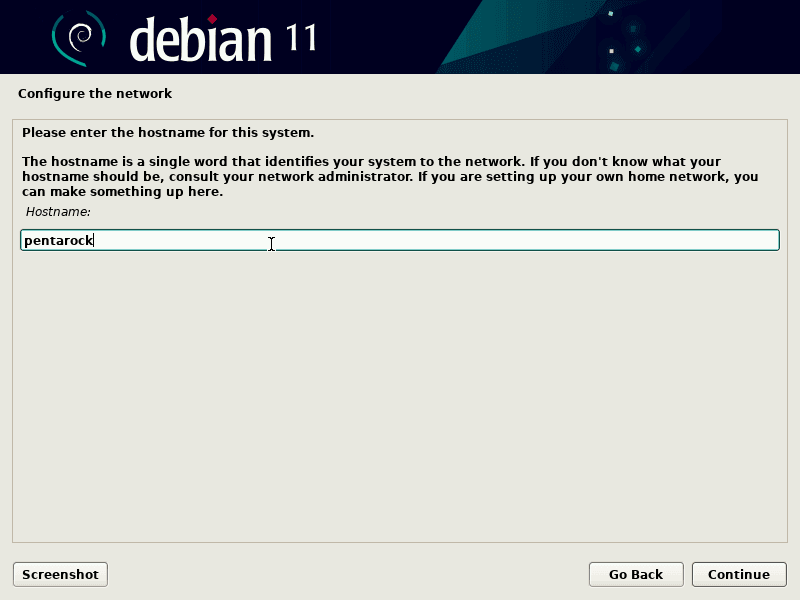
Enter the desired host name for your computer system. This may be your name and your company’s name or any other name you may like. Type the appropriate name in the textbox provided for the purpose and click the continue button to proceed to the next step.
Debian 11 – The Domain Name Entry Screen
The next screen will prompt you to enter the domain name for the computer system. Below given is an image of this display screen.
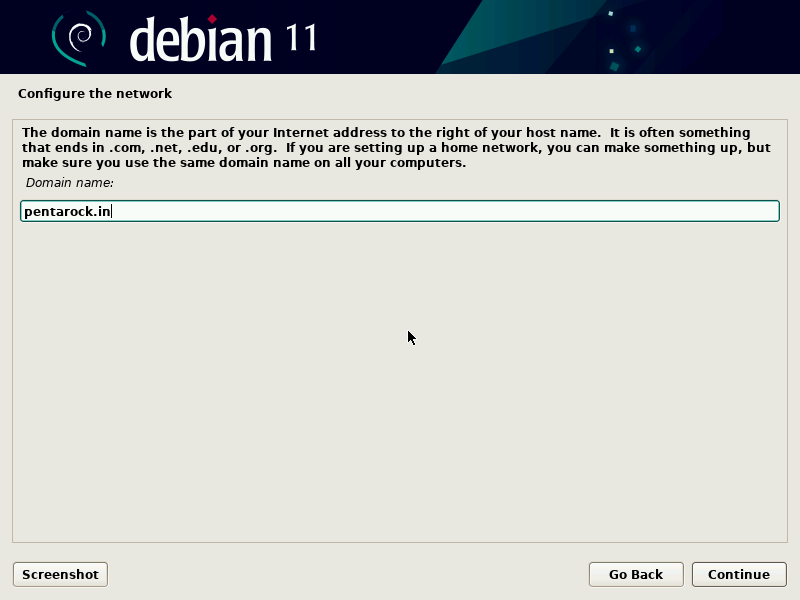
Enter the appropriate domain name and click continue button to proceed to the next step.
Debian 11 Root Users Password Setup Screen
The next screen will be to setup the root user’s password. Below given is an image of this display screen.
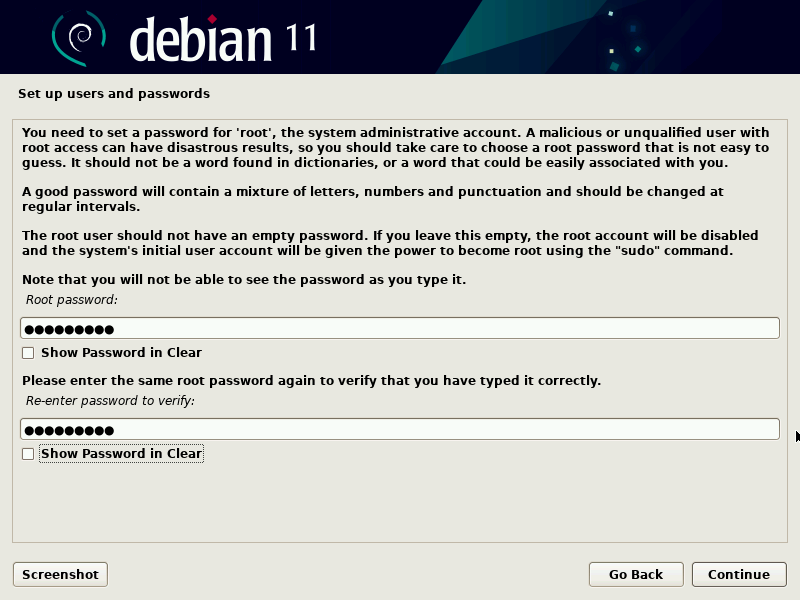
In the above set users and passwords screen select and enter a strong password for the root user. Confirm the same password by typing again in the textbox provided for the purpose. Click continues to proceed to the next step.
Debian 11 – New User Creation Screen
The next screen will be for the creation of new user for performing non administrative activities in the system. Below given is an image of this display screen.
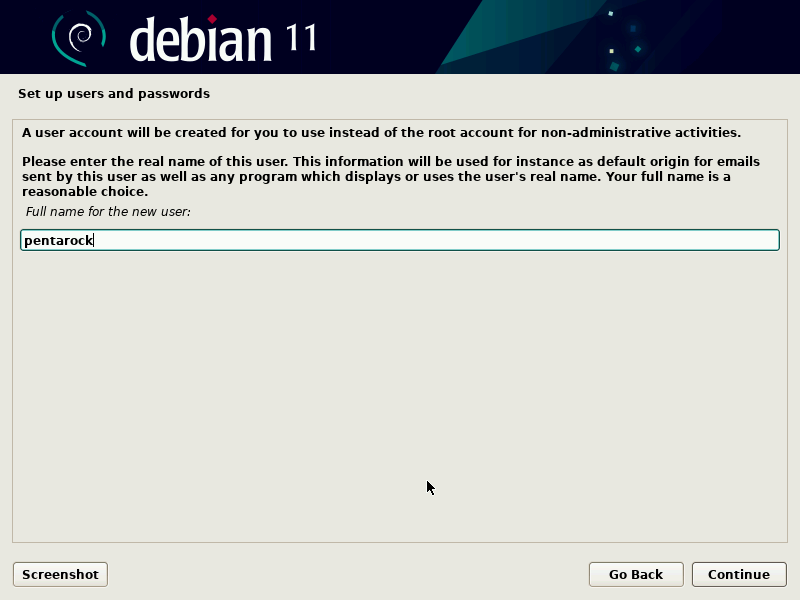
In the above screen enter the desired user name and click continue button to proceed to the next step.
Debian 11 – Create Password for New User
The next screen will be to setup the password for the newly created user. Below given is an image of this display screen.
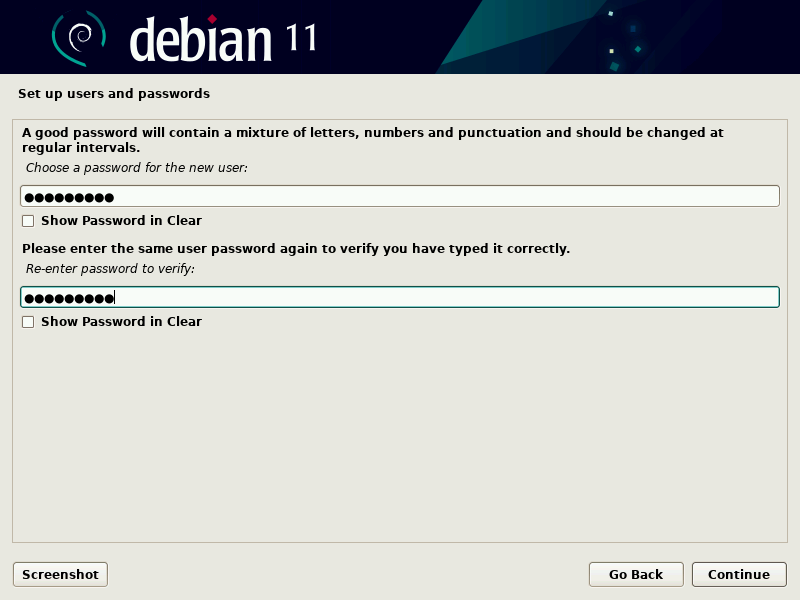
Now enter a strong password for the newly created user. Confirm the password by typing again the same password in the text box given for the purpose. Then click on the continue button to proceed to the next step.
Debian 11 – Create New partition
The next display screen will be for Hard Disk partition creation. Below given is an image of this display screen.
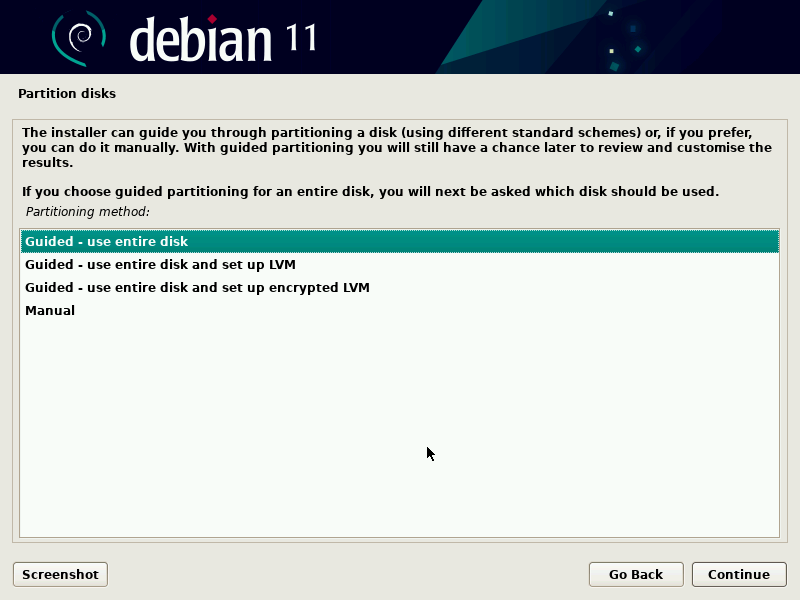
The above screen offers you the available partitioning methods to choose from. For most of the users the first partitioning method “Guided-use entire disk” will do. Select the first method as shown in the figure above and click continue to proceed to the next screen.
Debian 11 Bullseye – List of Available Disk Partitions
The next display screen will show the list of available disk partitions for installation of Debian 11 Bullseye. Below given is an image of this display screen.
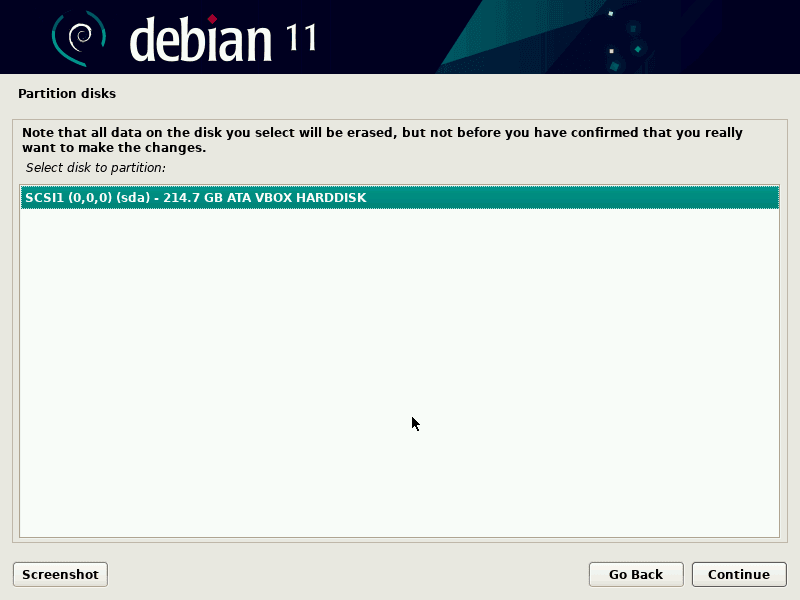
Select the appropriate disk for partitioning and installation of Debian 11. Click on continue button to proceed to the next step.
Debian 11 – Select Partitioning Scheme
Now the next display screen will show the available partitioning scheme to select one from. Below given is an image of this display screen.
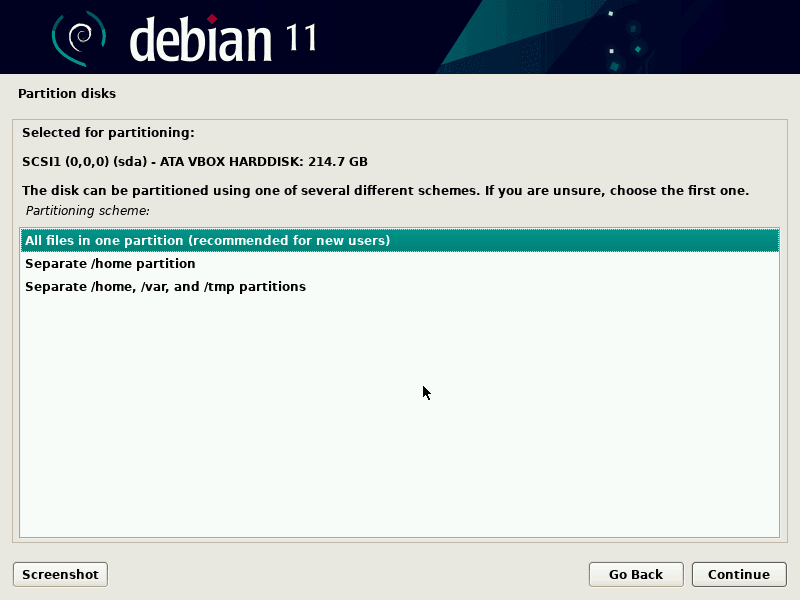
For most of the users the first option, “All files in one partition” will do. Select the appropriate partitioning scheme as required and click on continue button to move to the next step.
Next we will get a confirmation prompt from the installer before writing the partition scheme on to the hard disk drive. Below given is an image of this display screen.
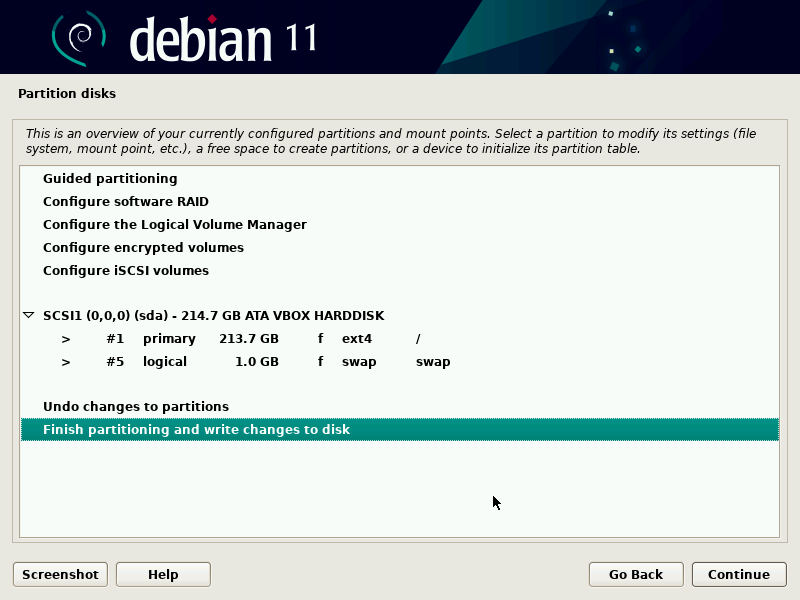
Now select the option “Finish partitioning and write changes to disk” and click continue to move to the next screen as shown below.
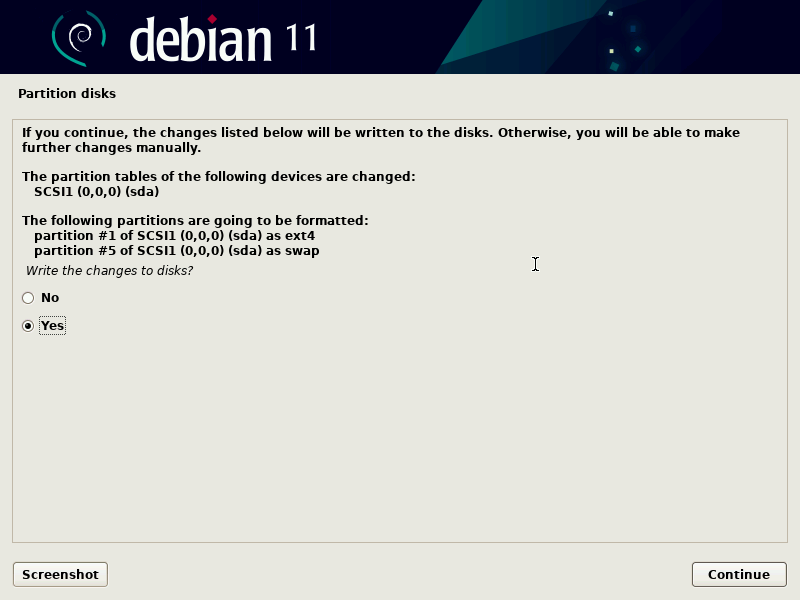
Now in the next partition disks display screen, select yes and click continue to move to the next step.
Debian 11 – Configure package Manager
The next display screen is configuring the package manager. Below given is an image of this display screen.
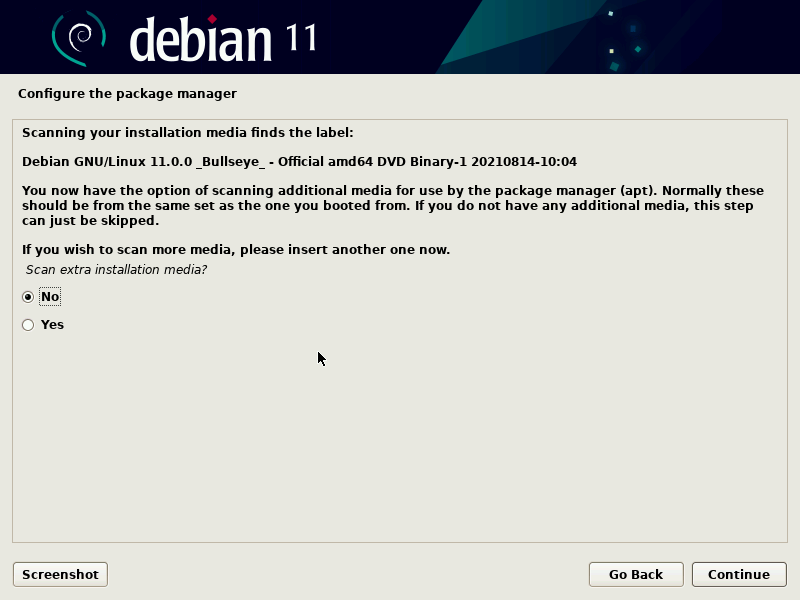
In this display screen select option “no” and click on continue button to proceed to the next step.
The next display screen is the configure package manager. Below given is an image of this display screen.
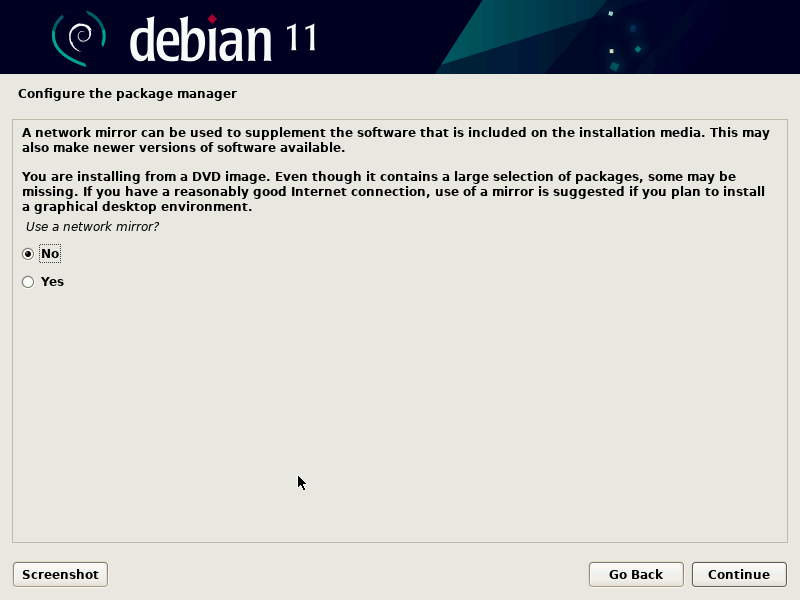
This display screen is for selecting network mirror if used. Here, select “No” and click on the continue button to proceed to the next step.
Next is the configuring popularity contest display screen. Below given is an image of this display screen.
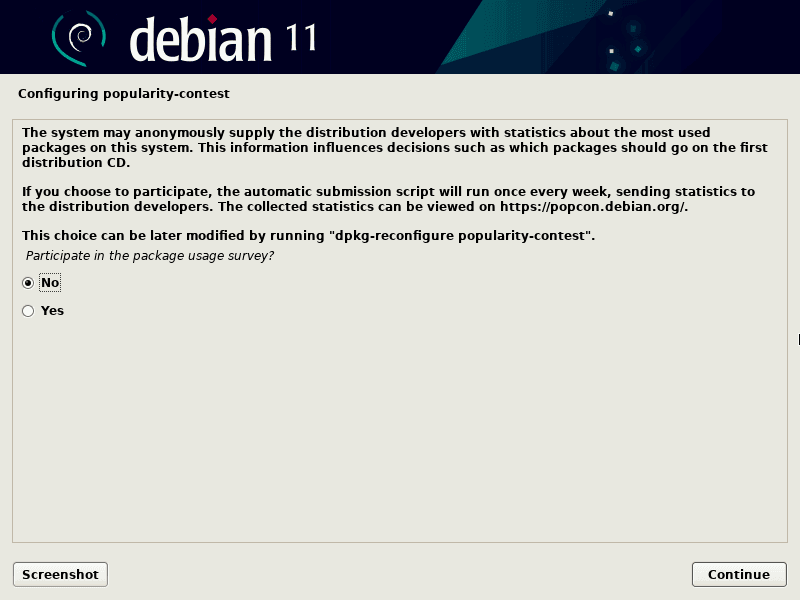
Moreover, in the above display screen select “No” and click the continue button to move to the next display screen.
Debian 11 Bullseye – Select Software packages to install
Software Selection is the next display screen. Below given is an image of this display screen.
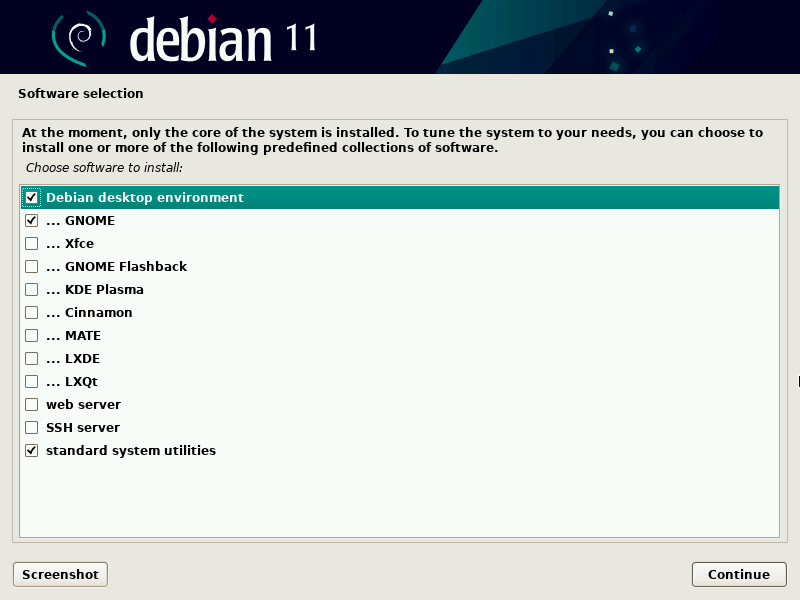
Select the appropriate software packages that you wish to install along with the Debian 11 Operating System. Click continue button to move to the next step.
Debian 11 Bullseye – Install GRUB Boot Loader
Further, the configuration part is complete and the installation of the operating system will begin. However, it will take about 10 to 15 minutes depending on your system configuration for installation of operating system and selected packages. Furthermore, a display screen confirming installation of GRUB boot loader will come up. Below given is an image of this display screen.
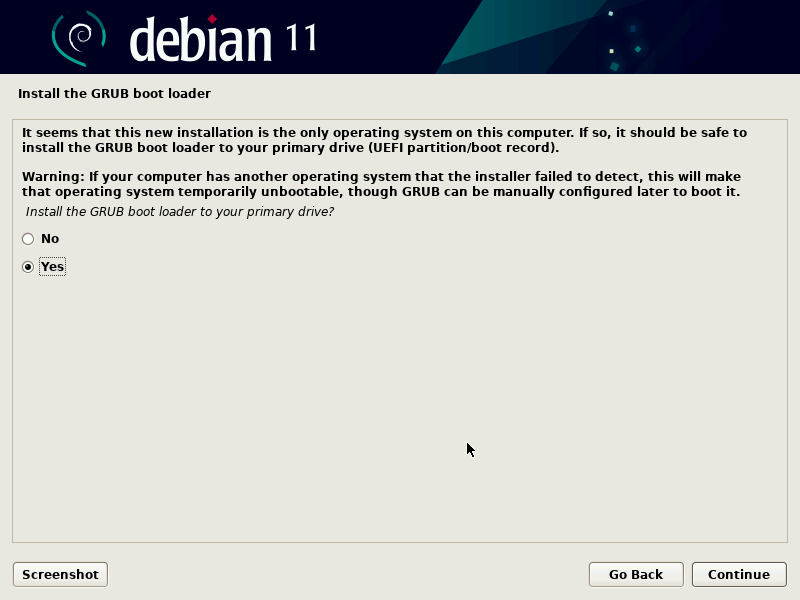
Here select yes and click on the continue button to proceed to the next step of installation process.
Further, in the next screen we will get a list on disk drives in the system to choose from for GRUB Boot Loader installation. Below given is an image of this display screen.
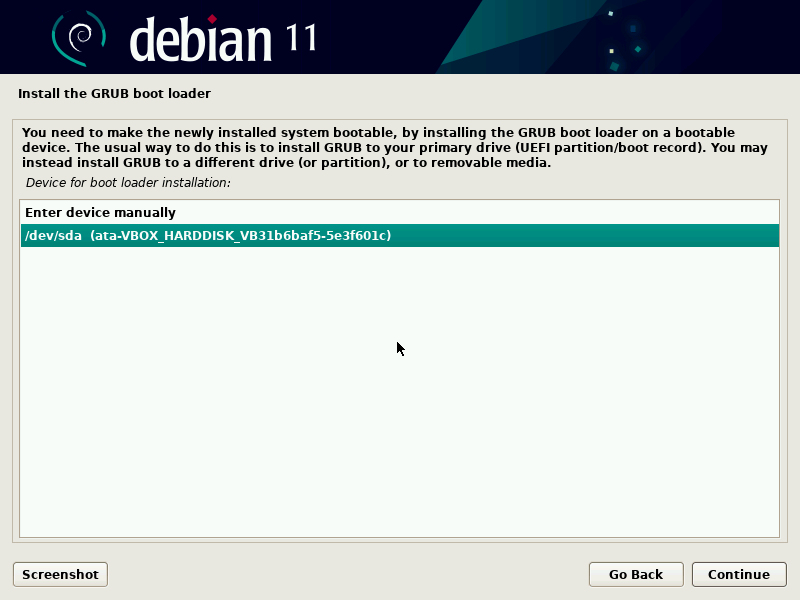
Select the appropriate primary disk partition and click on the continue button to proceed to the next step.
Debian 11 Bullseye – Finish the Installation
However, the next screen will prompt us that the installation is complete. Below given is an image of this display screen.
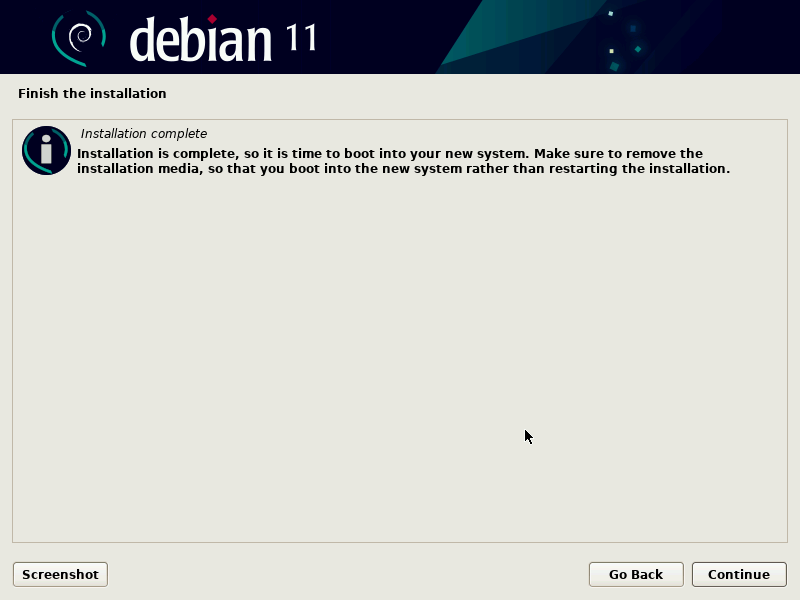
Additionally, remove the installation media from the disk drive and click on the continue button to restart the system. The system will restart to the login screen of the new Debian 11 Bullseye. Below given is an image of this display screen.
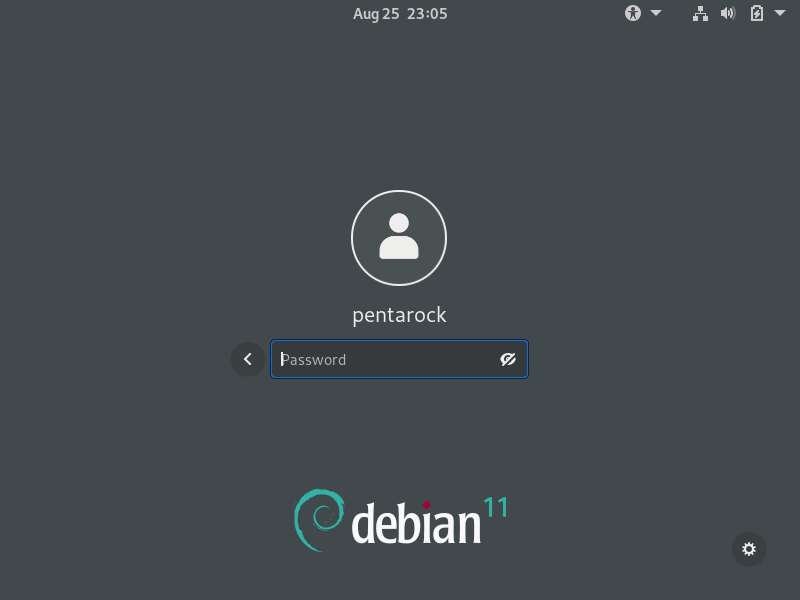
Enter the password and login to your newly installed Debian 11 Bullseye operating system. Enjoy!

