How to Install WordPress on Debian 10
In this tutorial we will learn how to install and setup WordPress on Debian 10 with pre-installed LAMP Stack. The LAMP stack comprises of open source applications Debian 10 Linux, Apache Web Server, MariaDB / MySQL Database Server and PHP a server side scripting language. Here we will use MariaDB Database Server at the back end.
| Link to The Official Website of Debian 10 Buster |
WordPress is easily the most widely used content management system. It powers 37 percent of the total websites on the net. This is 13 times more than Joomla CMS. WordPress Powers more than 455 million websites. We can easily create blogging websites, shopping carts, news websites etc. using WordPress Content Management System. WordPress is the most suitable option for quickly creating and hosting websites. It has a large community base. It has numerous paid and free themes and plug-in available.
| Link to The Official Website of WordPress |
WordPress uses MySQL or MariaDB Database Server at the back end. After the setup of WordPress is complete then all the administration can be done through the web frontend.
Prerequisites for the Installation of WordPress on Debian 10
- First, we will require a machine with pre-installed Debian 10 Buster Desktop / Server Linux operating System. If you want to fresh install Debian 10 operating system on your machine then you can follow the below given link:
How to Install Debian 10 Buster - Second, we will also require root / administrative User Name and Password of the Debian 10 System for installing related applications and their dependencies.
- Third, we will need a pre-installed LAMP Stack on our Debian 10 Buster system. If you want to fresh install LAMP Stack on Debian 10 Buster then you can follow our below given link:
How to Install LAMP Stack on Debian 10 Buster - The fourth point is that we will require a stable and fast internet connection for downloading and installing all the application and their dependencies along with WordPress.
- The fifth and the last point is that if you have a domain and you want to publish your website on this domain, then you should secure your website with TLS/SSL Certificate. The simple way to secure your website is to get a Let’s Encrypt Certificate. It is free and easy to implement.
After finishing the above setup, login to your system with administrative credentials.
First Create a Database and a User for WordPress in MariaDB
Before installing WordPress we have to decide
- Website Name.
- Back-end Database Name
- The Database User Name
After deciding the above, we will create and database and a associated user in our MariaDB Database Server. This database will be the back end of our website and will be used by WordPress.
Here we are using terminal window to better illustrate all the steps. You can also use MariaDB front end like phpMyAdmin to create database and users in MariaDB Database Server. Now to create a new database and user in MariaDB, open MariaDB and login to the MariaDB Database Server. Issue the following command in the terminal windows to log on to MariaDB database Server:
sudo mariadb -u root -pThis will prompt us to enter the root password. After entering the root password we will be logged in to the MariaDB Database Server as root user and will get MariaDB prompt.
On the MariaDB prompt issue the following command to create a new database. Here we are creating a database with the name of example_data. You can change the name of the database as decided by you.
MariaDB [(none)]> CREATE DATABASE example_data DEFAULT CHARACTER SET utf8 COLLATE utf8_unicode_ci;Next, we will create a separate MariaDB User Account to work exclusively with our newly created database. Creating a Single database and associated user is a good practice for security reasons as well as for the ease of management of the database. We will use the user name here as example_user for this database. You can use any other name that you like. Also it is advisable to create a strong password for your user for security reasons. Now issue the following command at the MariaDB Prompt to create a new user for our WordPress installation.
MariaDB [(none)]> GRANT ALL ON example_data.* TO 'example_user'@'localhost' IDENTIFIED BY 'your password';Now flush privileges and exit from the MariaDB Database Server. For this issue the following commands at the MariaDB Database Server Prompt:
MariaDB [(none)]> FLUSH PRIVILEGES;
Query OK, 0 rows affected (0.000 sec)
MariaDB [(none)]> QUIT;
Bye
Now we have successfully created our Database and Database User account for WordPress website.
Now we have to install some important PHP extensions that the WordPress content management system uses.
Install PHP Extensions used by WordPress
While installing the LAMP Stack we have installed the most common PHP extensions needed to work with Apache Web Server and MariaDB / MySQL Database Server. Now we will install some more PHP extensions that are used by WordPress and its plug-in. To install these PHP extensions issue the following command in the terminal window:
sudo apt-get install php-curl php-gd php-mbstring php-xml php-xmlrpc php-soap php-intl php-zipNow reload the Apache web Server service so that the newly installed PHP extensions may take effect.
To reload the apache Web Server issue the following command in the terminal window:
sudo systemctl restart apache2Now we will configure our website in Apache Web Server.
Configure WordPress Website in Apache Web Server
There is a file named 000-default.conf in the Apache Web Server folder /etc/apache2/sites-available/. This is the default configuration file. Make a copy of this file in the name of your website with the .conf extension. Here, we are using website name as example.com and document root folder as example. You can replace the document root folder name and website name to your document root folder name and website name. Now, to do this issue the following commands in the terminal window:
sudo cp /etc/apache2/sites-available/000-default.conf /etc/apache2/sites-available/example.com.confNow, open the example.com.conf file in your favorite text editor. We are using nano text editor.
sudo nano /etc/apache2/sites-available/example.com.confScroll down in the file and the lines between the virtualhost tags are to be changed are shown below:
#ServerName www.example.com
ServerAdmin webmaster@localhost
DocumentRoot /var/www/html
Remove the # before Server name and change the above content as shown below
ServerName www.example.com                [Replace with your Domain Name]
DocumentRoot /var/www/html/example_site   [Replace with your Document root path]
Now save the file and exit from the text editor. Next, we have to enable the rewrite module so that WordPress can use its permalink feature. To enable the rewrite module issue the following command in the terminal window:
sudo a2enmod rewriteAfter changing the content of the Apache Web Server configuration file issue the following command in the terminal window to check whether there is any syntax error in the conf file:
sudo apache2ctl configtestIf there are no syntax errors in the configuration file, then we will get the following output.
Output
Syntax OK
If the above command shows any error then open the conf file in your text editor and check for the errors. Remove the syntax error then check again using the above command.
If there is no errors in the conf file, then restart the Apache Web Server. To restart the Apache Web Server issue the following command in the terminal window:
sudo systemctl restart apache2Now the Apache Web Server configuration is complete.
Next we will download the WordPress installer file from the official website of the WordPress.
Download and Install WordPress on Debian 10 Buster
Now, we have created the document root folder, database and database user and configured Apache Web Server. Now we will download the WordPress Installer zip file. To download the installer we will be using curl utility of Debian Linux system. If this utility is not installed on your system then issue the following command in the terminal window to download and install the curl utility.
sudo apt-get install curlAfter the installation of curl utility is complete, navigate to the /tmp folder and issue the following command in the terminal windows to download the WordPress installer zip file:
sudo cd /tmp
sudo curl -O https://wordpress.org/latest.tar.gz
Now, extract the WordPress installer zip file. Issue the following command to extract the installer file:
sudo tar xzvf latest.tar.gzNow, navigate to the /tmp/wordpress folder created by the extraction of the installer zip file. Now create an empty .htaccess file in this folder. To create .htaccess file issue the following command:
sudo touch /tmp/wordpress/.htaccessNext, rename the sample WordPress config file as shown below.
mv /tmp/wordpress/wp-config-sample.php /tmp/wordpress/wp-config.phpNow, issue the following command to copy the entire content of the current folder to the document root folder you have created earlier. To do this issue the following command:
sudo cp -a /tmp/wordpress/. /var/www/html/example_site/Now the installation of WordPress is complete. Now we will configure WordPress to run our website.
Configure WordPress
The first step is to change the ownership of the document root folder so that Apache user can access it. To do this issue the following command in the terminal window:
sudo chown -R www-data:www-data /var/www/html/example_siteNext we will issue two find commands to set the correct permissions on the WordPress folders and files:
sudo find . -type d -exec chmod 755 {} \; # Change folder permissions rwxr-xr-x
sudo find . -type f -exec chmod 644 {} \; # Change file permissions rw-r--r--
Now some changes are required in the WordPress configuration file wp-config.php. To make these required changes, open the file in your favorite text editor and do the changes as shown below. We are using nano text editor:
sudo nano /var/www/html/example_site/wp-config.phpScroll down in the file and change the lines as shown below:
define( 'DB_NAME', 'example_data' );          [Enter Your Database Name]
define( 'DB_USER', 'example_user' );          [Enter Database User Name]
define( 'DB_PASSWORD', 'Your Password' );     [Enter Database User Password]
Now Scroll down in the file again and you will find the following lines:
define( 'AUTH_KEY',         'put your unique phrase here' );
define( 'SECURE_AUTH_KEY',  'put your unique phrase here' );
define( 'LOGGED_IN_KEY',    'put your unique phrase here' );
define( 'NONCE_KEY',        'put your unique phrase here' );
define( 'AUTH_SALT',        'put your unique phrase here' );
define( 'SECURE_AUTH_SALT', 'put your unique phrase here' );
define( 'LOGGED_IN_SALT',   'put your unique phrase here' );
define( 'NONCE_SALT',       'put your unique phrase here' );
Now open your browser and enter the following URL:
https://api.wordpress.org/secret-key/1.1/salt/The output on the web browser will be similar to the shown below:
define('AUTH_KEY',         '|KP}0i5RECgkK*kYtk>U=+Yvb+&iQXSD^dnZY>K&+J^Bc++4%=4r-7bNUglc^C+k');
define('SECURE_AUTH_KEY',  'l~ k$>Gf=A)?0;gsZ:d^p,<ZW]wxss3nUUcZBG7t~i`bI<5^2nPyWO0EaJB_A)M{');
define('LOGGED_IN_KEY',    '_nZu~E{?h%k?vl|AOz4GD=+&C8O!rx9aO*CmjIbjvZ3$-CvEaCP+fF!Vtk@ZFk2a');
define('NONCE_KEY',        '+a,NhwTS<|[_6`$>AuS[S_Iwpo*4pkm}d|{OvH3f1.ufPin;k ir<cS?9R]$0_$^');
define('AUTH_SALT',        'U*&10]nw.:i6.GzGO@$M5KsQEFv`]#G|&XOOCI%^42mm3+gK637KH*L>`Bk, u|~');
define('SECURE_AUTH_SALT', 'X9afn;/ShU~D7`Ftr;VWn760OWLndw~TT8nlt>e_DAVI@Sbs9}Hpui:I5,fQ]bY.');
define('LOGGED_IN_SALT',   'JLI,=?46D| T$=|IMG424]<uUxUT&1+=?Ut$3zt=xn+@;d/rjHT`SK_x%qn=CzI-');
define('NONCE_SALT',       'F:u+$<:`%Qm)!+k|IlYy=%h;C!7k^-mKdzQc?mcSX-)RQRNQ{$j$umb)N=FO |-.');
Just copy these lines and replace these lines in the file with the lines shown above. Now save the file and exit from the text editor. All the necessary steps are complete now.
Complete Rest WordPress Installation through Web Interface
Next open the web browser and enter your domain name or the IP Address:
http://Domain Name or_IP AddressThe following page will appear on the screen. Now select the language and click on continue.
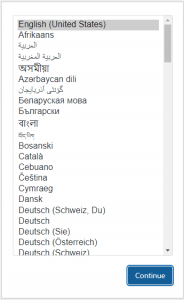
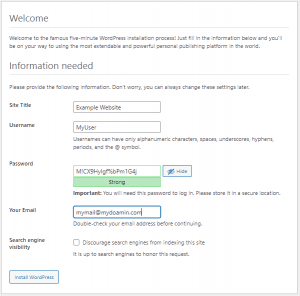
Now, the main WordPress setup page will be displayed. Enter name of the WordPress website. Enter username and a strong password. Also, enter your email address and select if you want to discourage search engines from indexing your site:
Enter the User Name and Password. We will be presented with the administration dashboard of WordPress as shown below:
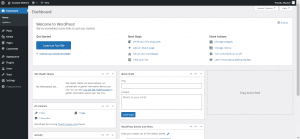
From the dashboard we can change the website theme, add plug-in, add content to our website. Now we are ready to publish our new website.

