How to Install WordPress on Windows 10 Using IIS Web Server
Introduction
In this tutorial we will learn how to install and setup WordPress on Windows 10 Using IIS Web Server. However, WordPress is easily the most widely used content management system. Moreover, it powers 37 percent of the total websites on the net. This is 13 times more than Joomla CMS. Furthermore, WordPress Powers more than 455 million websites. However, we can easily create blogging websites, shopping carts, news websites etc. using WordPress Content Management System. Additionally, WordPress is the most suitable option for quickly creating and hosting websites. It has a large community base. In addition to above, it has numerous paid and free themes and plug-in available.
However, WordPress uses MySQL or MariaDB Database Server at the back end. Additionally, after the setup of WordPress is complete then all the administration can be done through the web frontend.
Prerequisites for the Installation of WordPress on Windows 10
- First, we will require a machine with pre-installed Windows 10 operating System. If you want to fresh install Windows 10 operating system on your machine then you can follow the below given link:
How to Install Windows 10 - Second, here we are not using the WAMP Server, therefore pre-installed MySQL or MariaDB Database Server is also required. If you want to fresh install MySQL Database Server on your system then you can follow our tutorial for MySQL Installation on Windows. The link for the tutorial is given below:
How to Install MySQL 8.0 on Windows 10 - Third, we will need pre-installed PHP a server side scripting language on our Windows 10 system. If you want to fresh install PHP on your Windows 10 then you can follow our below given link:
How to Install PHP 8 on Windows 10 - The fourth point is that we will require a stable and fast internet connection for downloading and installing all the application and their dependencies along with WordPress.
- The fifth and the last point is that if you have a domain and you want to publish your website on this domain, then you should secure your website with TLS/SSL Certificate. The simple way to secure your website is to get a Let’s Encrypt Certificate. It is free and easy to implement.
First Create a Database and a User for WordPress
Before installing WordPress we have to decide:
- The Website Name
- The Back-end Database Name
- Database User Name
However, after deciding the above, we will create and database and a associated user in our MySQL Database Server. Moreover, this database will be the back end of our website and will be used by WordPress.
Furthermore, here we are using command window to better illustrate all the steps. However, you can also use MariaDB front end like phpMyAdmin or HeidiSQL to create database and users in MySQL Database Server. Furthermore, to create a new database and user in MySQL, open MySQL and login to the MySQL Database Server. Issue the following command in the command windows to log on to MariaDB database Server:
mysql -u root -pHowever, this will prompt us to enter the root password. Moreover, after entering the root password we will be logged in to the MySQL Database Server as root user and will get MySQL prompt.
Database Creation
On the MySQL prompt issue the following command to create a new database. Here we are creating a database with the name of wpdata. You can change the name of the database as decided by you.
CREATE DATABASE wpdata DEFAULT CHARACTER SET utf8 COLLATE utf8_unicode_ci;| Query OK, 1 row affected, 2 warnings (0.14 sec) |
Next, we will create a separate MySQL User Account to work exclusively with our newly created database. Creating a Single database and associated user is a good practice for security reasons as well as for the ease of management of the database. We will use the user name here as wpuser for this database. You can use any other name that you like. Also it is advisable to create a strong password for your user for security reasons. Now issue the following command at the MySQL Prompt to create a new user for our WordPress installation.
CREATE USER 'wpuser'@'localhost' IDENTIFIED BY 'password';| Query OK, 0 rows affected (0.11 sec) |
GRANT ALL PRIVILEGES ON wpdata.* TO 'wpuser'@'localhost';| Query OK, 0 rows affected (0.11 sec) |
Now flush privileges and exit from the MySQL Database Server. For this issue the following commands at the MySQL Database Server Prompt:
FLUSH PRIVILEGES;| Query OK, 0 rows affected (0.05 sec) |
QUIT;| Bye |
Now we have successfully created our Database and Database User account for WordPress website.
Install PHP Extensions used by WordPress
Now we have to enable some important PHP extensions that the WordPress content management system uses. To enable these extensions open the php.ini file in your favorite text editor. We are using notepad++ editor. Remove the comment from the following extensions in the file.
extension=curl
extension=gd2
extension=mbstring
extension=php-xmlrpc
extension=soap
extension=intl
Download, Install and Configure WordPressNow we will install and configure our WordPress website in IIS Web Server.
To download WordPress installer zip file, open your browser and navigate the official website of WordPress. The link to the official website of WordPress is given below:
| WordPress Download Link From the Official Website |
At the time of writing this tutorial the latest version of WordPress is 5.8. Now scroll down the page and click the button Download WordPress 5.8. The download will start immediately.
Install & Configure WordPress
After the download is complete extract the zip file in any temporary folder. The extracted folder name will be wordpress. If you have a domain then you can rename the folder to the domain name or any other name you like.
We will be using our website name as wordpress. Also we will use the folder name as wordpress.
Now, change directory inside the wordpress folder. Here you will find a file wp-config-sample.php. Rename this file to wp-config.php.
Open the file in any text editor and enter the database name, database user name and database password in the location given for the purpose.
Further scroll down in the file and search for the line containing the string “Authentication unique keys and salts.”. Here you will find the AUTH keys as shown below:
define( 'AUTH_KEY',         'put your unique phrase here' );
define( 'SECURE_AUTH_KEY',  'put your unique phrase here' );
define( 'LOGGED_IN_KEY',    'put your unique phrase here' );
define( 'NONCE_KEY',        'put your unique phrase here' );
define( 'AUTH_SALT',        'put your unique phrase here' );
define( 'SECURE_AUTH_SALT', 'put your unique phrase here' );
define( 'LOGGED_IN_SALT',   'put your unique phrase here' );
define( 'NONCE_SALT', 'put your unique phrase here' );https://api.wordpress.org/secret-key/1.1/salt/Now open a new tab in your browser and enter the following URL in the address bar:
The output in the browser will be similar to the given below.
define('AUTH_KEY',         ':7gJOLRwi-e&ragBTA+Fx+QaFD#IaeF0p{f| T~}?]z:e-U!c>Zbj!&[GZ[vmku ');
define('SECURE_AUTH_KEY',  'J=FR-KeWa/~Z0T=@B|i;Bua;5jY=<3XQDuV6!Yg#%/m_U;|j+^Tma|lVp|2nVqe5');
define('LOGGED_IN_KEY',    '%N]Jx-{JF?ApZ[G*IFdc[3?x{71O.3!%ewZk;/ZY3JFyvGBZGpQ5g~|el^5HDTx%');
define('NONCE_KEY',        'dnLn$ ?NeGg&sjo;^WM>1{Mvm=)-`iaapV#~Y_>{nD?%XuXE!Z|Ze5+8:%ez.-xK');
define('AUTH_SALT',        'LK)$T=2Xi=A{G6JT|a+N;d>Otq!W7(=m4&X8UM7*,L]Gh-RQ4swb%vtt-L@0mkJ+');
define('SECURE_AUTH_SALT', '=q%P]S{SLb=3[>wA;*ylVOrLR+aH-GCRI}o|98a+G-<uN_jLM1;`{+~y91fVP|,w');
define('LOGGED_IN_SALT',   'wc&dJvjHy6sGM=xEyP.mCz^$gPP-EiNY!?gZr|67sStowB7yW--)@/N)kvoXD<Tz');
define('NONCE_SALT',       'v1Ve;uOSh*)kk1j/W|rY/|A*O7gH9J||N=pf+wX#++_p7So(+.5N(lVz2hNd2kp:');
Now replace the above lines with the generated AUTH keys and save the file and exit from the text editor.
Configure Website in IIS Web Server
Next move this folder inside C:\inetpub\wwwroot folder. The absolute path to our wordpress folder will become C:\inetpub\wwwroot\wordpress. WordPress is now installed on your localhost. It can be accessed by typing the following URL in the address bar of the browser.
http://localhost/wordpressIf you are using your own domain and want to make your website public then you have to do some configurations in IIS Web Server. Change the permissions of the folder wordpress that we copied in the wwwroot folder as shown below in the figure.
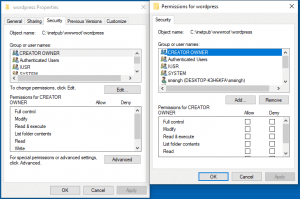
Grant read-write permissions to IIS from the security settings. For this Modify permission for IIS_IUSRS (IIS user group) and IUSR (default IIS user).
Next, we have to open the IIS Manager and then create a new website in our server instance. We can do this by right-clicking Sites in the left pane and choosing Add new website As shown in the figure below:
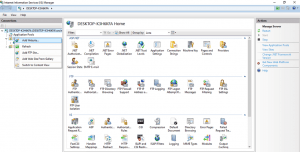
Next, enter the website name then enter the physical path to the folder. Then, enter the host name or domain name the website will be available on. This domain name will be pointing to the IIS web server. Now, confirm and click OK as shown in the figure below:

However, to enable the use of user friendly permalinks feature in WordPress, it is required to enable URL rewriting. For this we need to have the URL Rewrite module for IIS installed.
Furthermore, it is required to create a web.config file in the root directory of our website. Next, add the following lines of rewrite rule in the file as shown below:
<?xml version="1.0" encoding="UTF-8"?>
<configuration>
<system.webServer>
<rewrite>
<rules>
<rule name="Wordpress" patternSyntax="Wildcard">
<match url="*"/>
<conditions logicalGrouping="MatchAll">
<add input="{REQUEST_FILENAME}" matchType="IsFile" negate="true"/>
<add input="{REQUEST_FILENAME}" matchType="IsDirectory" negate="true"/>
</conditions>
<action type="Rewrite" url="index.php"/>
</rule>
</rules>
</rewrite>
</system.webServer>
</configuration>
Now our website will be successfully hosted on IIS Web Server.
Complete Rest WordPress Installation through Web Interface
Furthermore, open your Web Browser and enter the following URL in the address bar of the browser
http://localhost/wordpress  [ if installed on localhost]
http://your domain name     [ if installed and configured in IIS Web Server for your Domain Name]
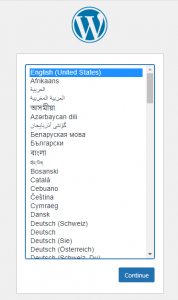
However, the first screen will be displayed as shown below. Furthermore, in this screen select the language and click on continue button at the bottom of the screen to proceed to the next step.
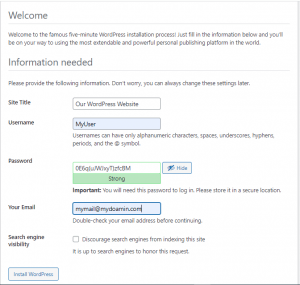
Additionally, on the next screen enter the website name, User Name, Password and your E-Mail Address. Moreover, check mark search engine visibility as per your requirement. Further, click on Install WordPress button to start the installation of WordPress.
However, after this the WordPress Installation will be complete and we will see the screen as shown below.
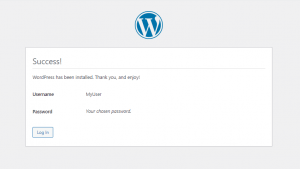
Furthermore, click on the Login Button to proceed to the administrative login screen as shown in the figure below.
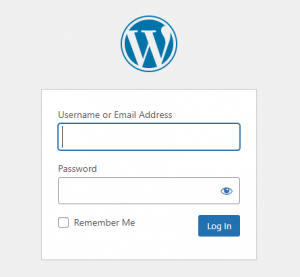
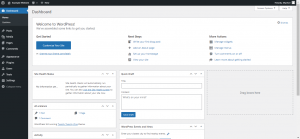
Further, enter your User Name and Password to Login to the WordPress dashboard. However, from here we can add new themes for our website. We can also add new plug-ins and manage our new website. However, given below is the screenshot of the administrative dashboard of WordPress:
Now our WordPress installation is complete and we are ready to create and host new website.

