How to Install Multiple Versions of Java on Debian 11 Bullseye
There are many applications and tools that use Java Virtual Machine (JVM) and Java to run. However, Java is one of the most popular and widely used programming languages. Moreover, Java is a platform independent programming language. Additionally, in this tutorial we will learn how to install multiple versions of Java on Debian 11 Bullseye operating system. Moreover, in this tutorial we will install Java Development Kit using the apt command of Debian 11. However, we will also learn how to install different versions of JDK (Java Development Kit) on Debian 11 Bullseye.
Furthermore, we will install OpenJDK 11 using the apt command of Debian OS. However, after this we will also install official JDK 16 from the Oracle’s website. Moreover, we will also learn how to select a specific version of JDK for our different projects. Additionally, while installing Oracle’s JDK, the Java Runtime Environment will be installed automatically along with JDK installation.
Furthermore, the core objective of this tutorial is to enable our readers to be able to install and use different versions of JDK and JVM on Debian 11 Bullseye operating system.
Prerequisites for Installing JVM and JDK on Debian 11 Bullseye
Following are the prerequisites for installing JVM and JDK on Debian 11 Bullseye operating system.
- The first thing that we will require is a Desktop or a Laptop system with preinstalled Debian 11 Bullseye Desktop or Server version of operating system.
However, if you want to install Debian 11 Bullseye desktop version on a new system. Then you can follow our tutorial ‘Install Debian 11 Bullseye’. The link to this tutorial is given below:
| Install Debain 11 Bullseye |
- Next we will require root user permissions or non root sudo permissions to download and install the software from the official website.
- We will also require a stable and fast internet connection for downloading and installing the software from the official website.
Installation of Default Version of Java on Debian 11 Bullseye
Initially, we will have a look at how to install the default version of Java on Debian 11 Bullseye. Debian operating system always has a default version of Java in its repository. Installing the default version of Java is the most simple method of installing Java. The default version of Java repository contains the open-source version of Java that is, OpenJDK and JRE, the development kit and the runtime environment. Java 11 is the current Long Term Supported version of Java on Debian 11.
System Update
Before start of installing java on Debian 11, first update the system. To update the system open the terminal window and issue the following command as given below.
sudo apt-get updatesudo apt-get upgradeHowever, before installing the Java, we should verify whether java is pre-installed on our system or not. To verify this, issue the following command in the terminal window.
java -versionIf Java is not installed on the system then the following will be the output of the above command.
| pentarock@pentarock:~$ java -version bash: java: command not found |
However, to install the default version of the Java Runtime environment, open the terminal window and issue the following command.
sudo apt install default-jreAfter this, you will be prompted to accept the installation by the apt installer. On entering ‘Y’ or yes the apt installer will install the default JRE on your system. To verify the installation of Default-JRE, issue the following command in the terminal window.
java -versionThe output of the above command will confirm the installation of Default-JRE version by showing the installed version on the screen as shown below.
| root@pentarock:/home/pentarock# java -version openjdk version “11.0.12” 2021-07-20 OpenJDK Runtime Environment (build 11.0.12+7-post-Debian-2) OpenJDK 64-Bit Server VM (build 11.0.12+7-post-Debian-2, mixed mode, sharing) |
Additionally, for the purpose of Java Programming we will need to compile and run the Java code on our system. To compile and execute the Java code on our system we will require Java Development Kit (JDK) to be installed on our system. To install the Default JDK version on Debian 11 Bullseye, issue the following command in the terminal windows as given below.
sudo apt install default-jdkVersion Check
The above command will prompt you to provide the permission to install JDK on your system. When the confirmation is provided in affirmative, then the apt installer will install the JDK software on the system. After the installation of the OpenJDK is complete, then we should verify whether the JDK is correctly installed on our system. To verify the installation issue the following command in the terminal window.
javac -versionIf the open source and default Java development Kit is correctly installed, we will see the following output on the screen.
| root@pentarock:/home/pentarock# javac -version javac 11.0.12 |
That’s it. Now we have successfully installed the default JRE and JDK on our Debian 11 Bullseye system.
Installation of Oracle Java SE Development Kit 16
Now we will learn how to install Oracle Java Standard Edition Development Kit Version 16. At the time of writing this article Oracle Java Standard Edition Development Kit Version 16 is the latest version available on the official website. To install this version first we have to open the official website’s download page in our favorite browser. Then we have to select the .deb file of the installer version. Given below is the URL to the official website’s download page.
Oracle Java SE Development Kit 16 Installer Download LinkThe page looks like the one given below.
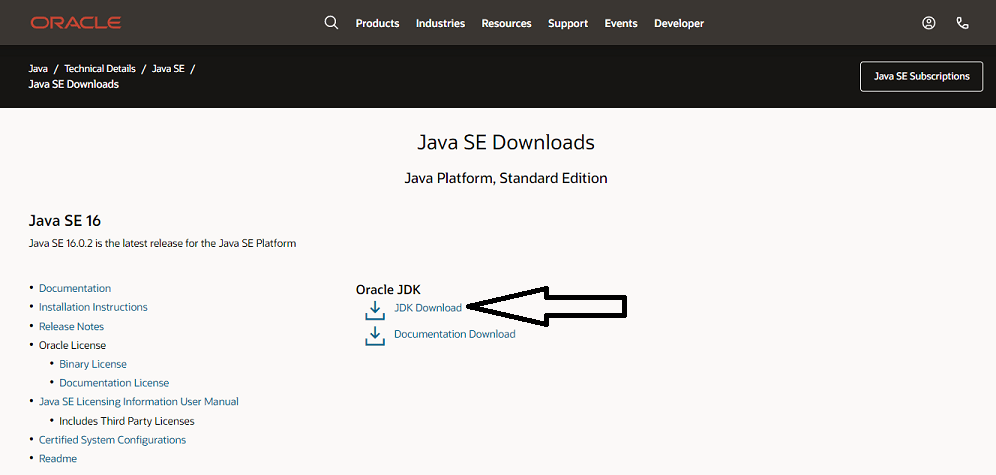
Now click on the download link shown with the arrow in the figure above. This will navigate to the next download page. Scroll down the page and you will see a download list of installer files of Java SE Development Kit for different operating systems.
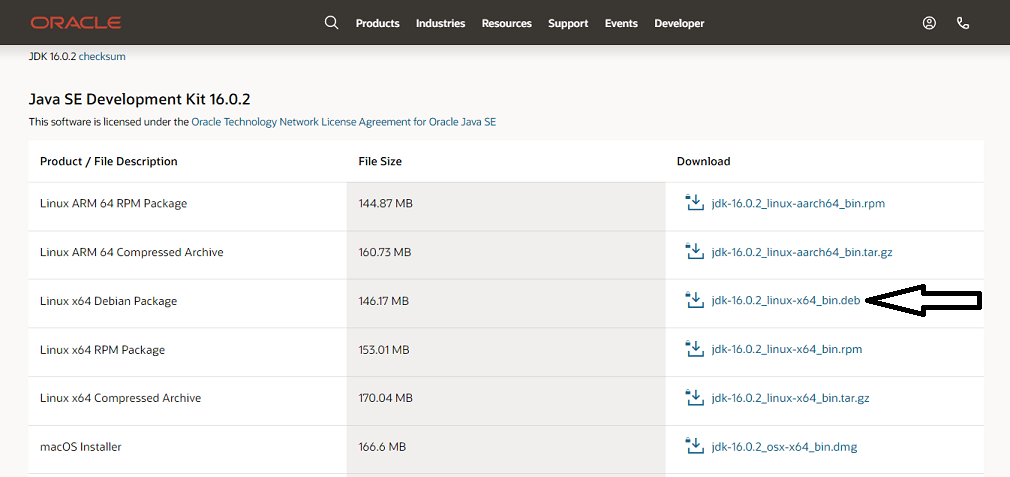
Our operating system is Debian 11 Bullseye therefore click on the Linux x64 Debian Package link of the installer file with the extension .deb to download the installer file. When you will click on the download link, a popup asking to agree to the license agreement will appear on the screen as shown below.
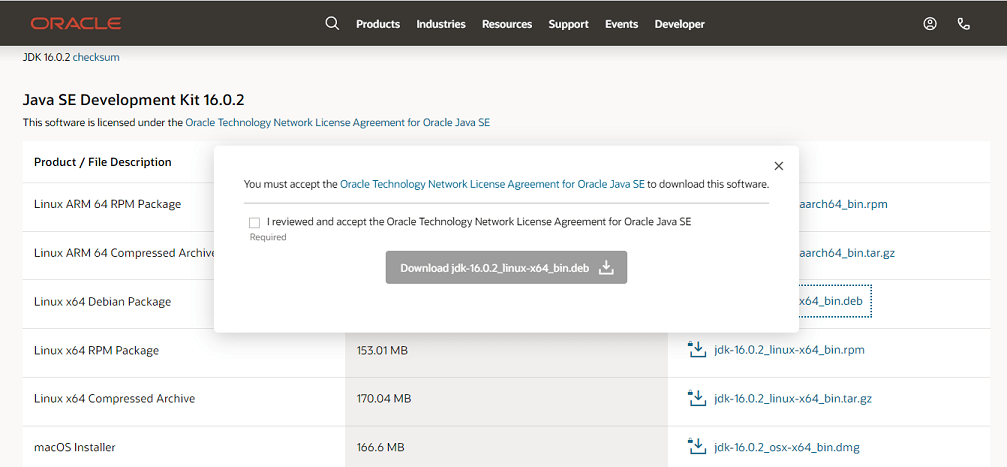
Now, accept the agreement by clicking and check mark the box provided for the purpose and click download button to start the download of the installer file. Now navigate to the folder where the installer file is downloaded. In my case the installer file is download in Downloads folder. Then issue the following command in the terminal window to begin the installation.
sudo dpkg -i jdk-16.0.2_linux-x64_bin.debAfter the completion of the above command the Oracle Java SE Development Kit 16 installation is complete and you can start using Java version of your choice.
Set JAVA_HOME Environment Variable
Here, we will set the JAVA_HOME Environment Variable. Many programs need JAVA_HOME environment variable to find the location of Java installation on the disk for their proper execution. We will set the JAVA_HOME environment variable for Installation of Oracle Java SE Development Kit 16. Now open the terminal window and run the following command set the path.
sudo update-alternatives --install /usr/bin/java java /usr/lib/jvm/jdk-16.0.2/bin/java 1sudo update-alternatives --install /usr/bin/javac javac /usr/lib/jvm/jdk-16.0.2/bin/javac 1Now run the following command in the terminal window to check all the installed versions on java on your system.
sudo update-alternatives --config javaThe output of the above command will be similar to as given below.
sudo update-alternatives –config java |
Now select 2 and the default version of Java on your machine will become Oracle Java Version 16.
That is all done. The installation and the configuration of Multiple Versions of Java on Debian 11 Bullseye is complete and now you can start using any of the versions of java as you may like. Enjoy!

