Install MX Linux 19.4 with Screenshots
In this tutorial we will see how to install MX Linux 19.4 with screenshots. Undoubtedly MX Linux 19.4 is the most popular Linux distribution at the time of writing this blog post. However, according to the Distrowatch MX Linux is at number one spot in the average hits per day (HPD) ranking. Moreover, as with most of the other Linux distributions MX Linux 19.4 is also an open source and freely available operating system. MX Linux is a desktop Linux operating system based on Debian 10 Buster. The default Desktop Environment of MX Linux19.4 is Xfce. Additionally, Xfce is a lightweight and fast desktop environment. MX Linux 19.4 is a medium weight Linux Distribution with impressive and fast desktop. However, MX Linux has the capability of automatic hardware recognition and configuration. It is a stable Linux distribution as it is based on Debian 10 Buster stable distribution.
Furthermore, MX Linux19.4 has a large and dedicated community of developers and users. Regular MX Linux updates are released by its dedicated community of developers. Furthermore, MX Linux can be installed as the main and single operating system. It can also be installed as a dual boot operating system along with any other operating system like windows 10. It can also be installed as a guest operating system on Virtualbox or any other virtual environment. However, for this article I am using Virtualbox for the installation of MX Linux. The installation steps and configuration will remain same for the stand alone installation of MX Linux on your computer. Now we will have a look on the prerequisites or the system requirements for the installation of MX Linux operating system.
Prerequisites for the Installation of MX Linux Operating System
Additionally, before the start of the installation process we should ensure that our system configuration complies with the recommended minimum system configuration of MX Linux 19.4. Given below is the point wise description of minimum and recommended system requirement.
- Our computer system should have a minimum i686 Intel or AMD processor to start with.
- We will require a minimum of 512 MB RAM for the installation of MX Linux, but it is recommended that the system should have 2 GB or more RAM for the best performance.
- A minimum of 5 GB of Hard Disk space is required for installation of MX Linux 19.4, although it is recommended to have 20 GB of free Hard Disk space for best performance of the OS.
- It is recommended to have a 3D video card for 3D desktop support.
- It is also recommended to have a sound blaster card like AC97 or it may be HD compatible sound card.
- We will also require a stable and fast internet connection for downloading the installer ISO file of MX Linux Operating System from the official website.
- Our computer system should have a CD/DVD/USB Drive for external booting and installation of the operating system.
- We will also require a blank DVD or USB disk with a minimum 4 GB capacity for the creation of installer media from the downloaded ISO file.
Furthermore, after fulfilling the above requirements, we are ready to start the installation of MX Linux Operating System on our Desktop or Laptop Computer System. Here in this tutorial we will also explain how to create the installer USB disk from the installer ISO file.
Download MX Linux Installer ISO File
Now download installer ISO file from the official website of MX Linux. Given below is the link to the official website’s installer ISO download page.
| Link to the Official Website of MX Linux for ISO Installer File Download |
Create USB Installer Media from Downloaded ISO File
However, if you are a Linux user then you do not need any application tool to create the USB installer media. Just use the “dd” command of Linux to create USB installer media from the downloaded ISO file.
Startup Disk Creator, UNetbootin and Rufus are some of the many application tools that are freely available to create USB installer media. If you are a Linux user and you want any application tool to create startup installer media then you can use UNetbootin application.
If you are a Windows user then you can use Rufus application to create the startup installer media on your USB stick from the downloaded ISO file.
The installation of Rufus and UNetbootin is quite straight forward and simple. The download link for both the application tools is given below.
| Link to the Official Website of UNetbootin for Application Download |
| Link to the Official Website of Rufus for Application Download |
Further we will show how to create the installer USB drive on Windows system using Rufus Disk Creator.
How to Create USB installer Using Rufus Disk Creator Tool
Insert the USB stick in the USB Disk Drive and run the Rufus Disk Creator tool. Rufus will automatically detect your USB Drive and will display it as shown in the figure below. Now select the downloaded installer ISO file as shown in the figure.

Now click on the start button on the bottom of the screen. Rufus will warn you that the USB Stick will be formatted and all the data on the USB Disk will be lost. Click on the OK button to proceed to create the USB installer Disk. It will take some time to create the installer disk. After the creation of the disk click close button to complete the process.
Now we are ready to start the installation of MX Linux 19.4 on our Desktop / Laptop Computer.
Install MX Linux 19.4 on Desktop / Laptop System
Further, boot your system and enter the BIOS menu by pressing DEL or ESC or F2 or F9 or F10 or F12 key. Different manufacturers assign different keys to enter into the BIOS menu. Once you are in the BIOS menu, assign the USB disk drive as the first boot device. Save and exit the BIOS menu. Now insert the USB disk into the disk drive and restart your computer. Now your system will boot from the USN Disk and you will see the MX Linux 19.4 welcome screen on your display device as shown below.
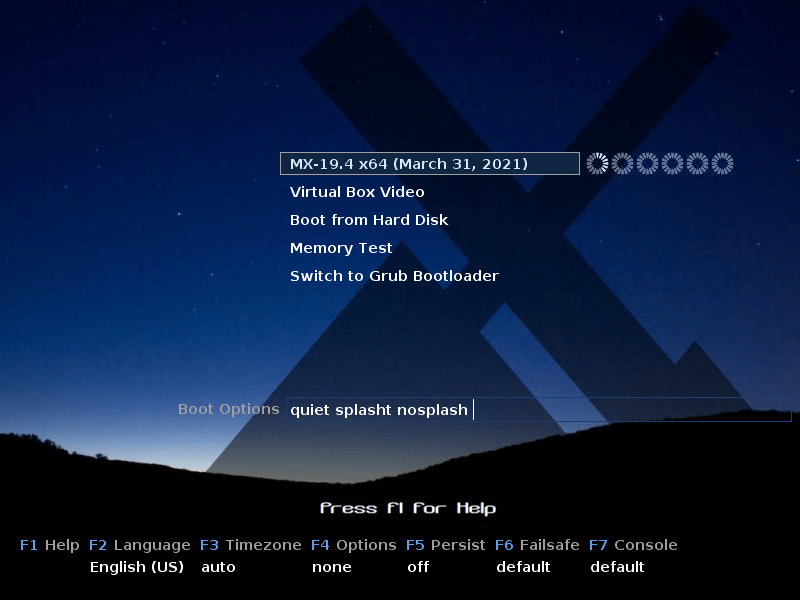
Select the first option and press the enter key to boot into the live session of MX Linux 19.4. This will boot your system for the USB diskette and MX Linux desktop will appear on your display screen. Here you can have hands on experience and have a look and feel of MX Linux. Feel free to open the application menu and run the applications bundled with the Operating System. Open the Xfce terminal and try some Linux commands in the terminal window. The Desktop screen will look like as shown in the below given figure.
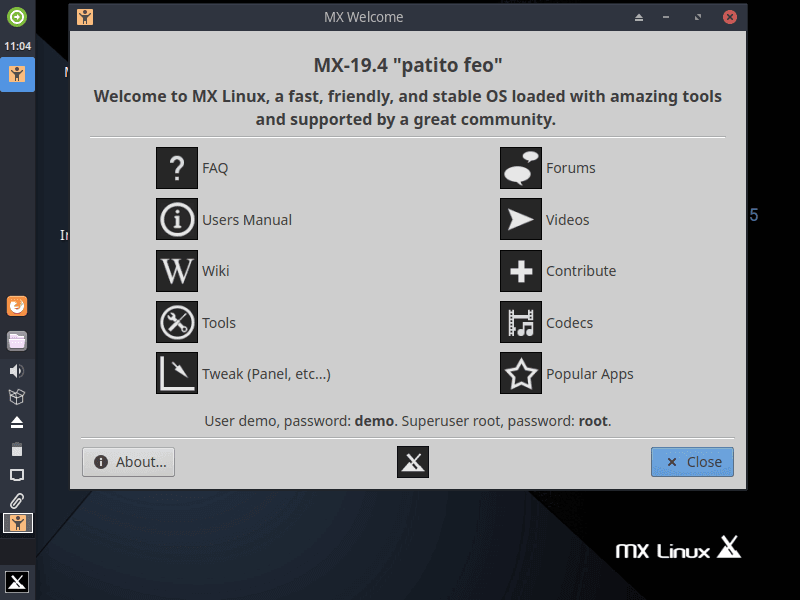
The Welcome Screen
The welcome screen will provide links to FAQ, Official User Manual, Forums, Wiki, Tools, Tweak etc. Click on the close button at the bottom right corner of the popup screen and you will get the MX Linux actual Desktop as shown in the figure below.

Begin Installation
Next click on the desktop icon “Installer” and the installation of MX Linux on your system will begin. Below given is the next screen.

Click Next button to proceed to the next screen as shown below.
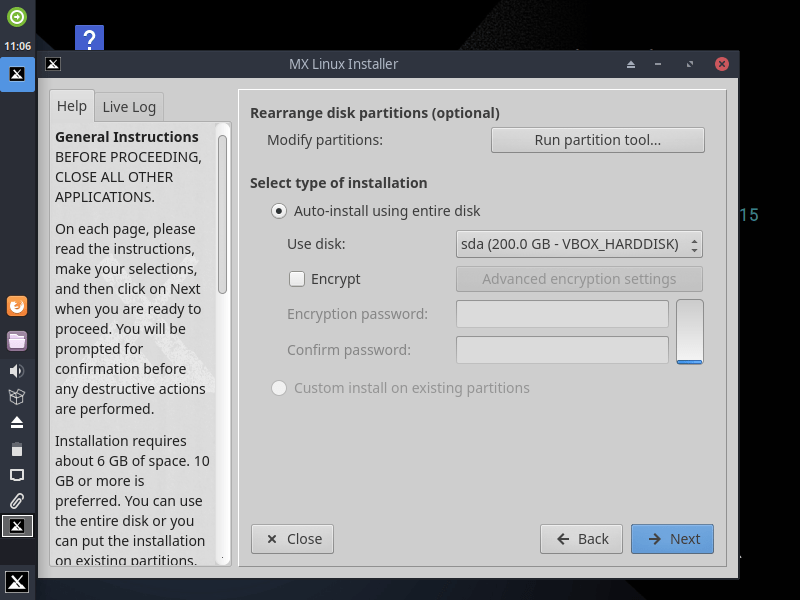
Hard Disk Partitioning
Furthermore, select the hard disk partition on which you want to install your new MX Linux OS. For most of the users the option of auto install using entire disk will be the best option to proceed. If you want to make partitions manually then click on the run partition tool button and proceed to manually create disk partition. To encrypt the disk partition check mark the encrypt option and provide the encryption password as shown in the figure. Next, click on next button at the bottom right corner of the screen to proceed to the next step. Below given is the next display screen.
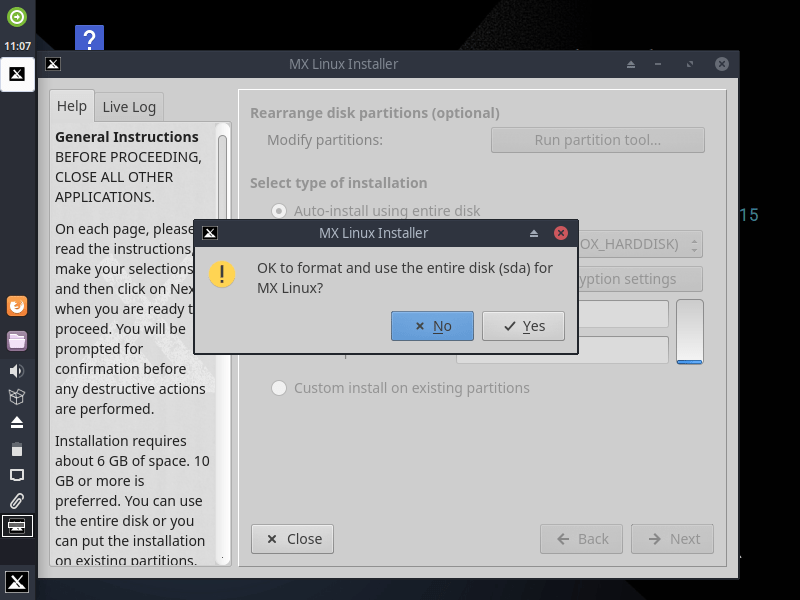
Next screen will be the confirmation screen. Just click on the next button to proceed to the next screen as shown below.
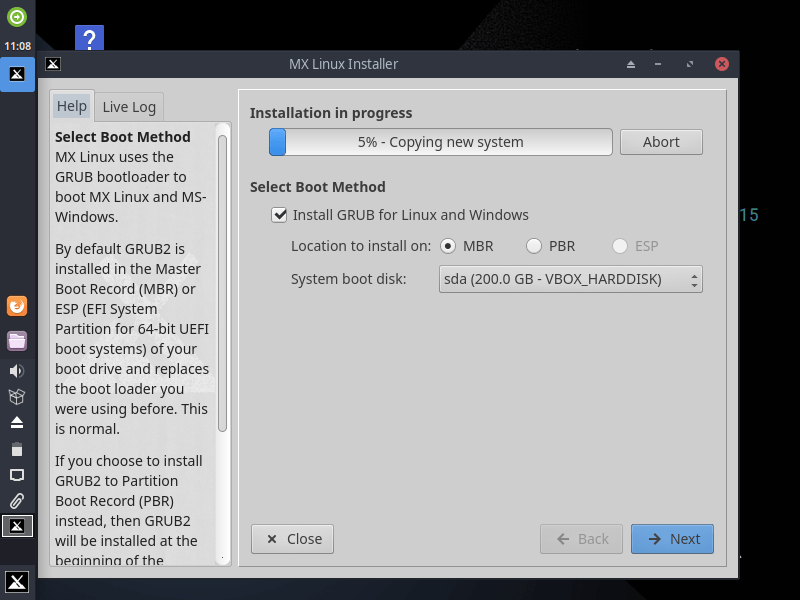
System Configuration
Now select the disk partition where the GRUB boot loader has to be installed. Then click on the next button to proceed to the next step as shown in the below given figure.
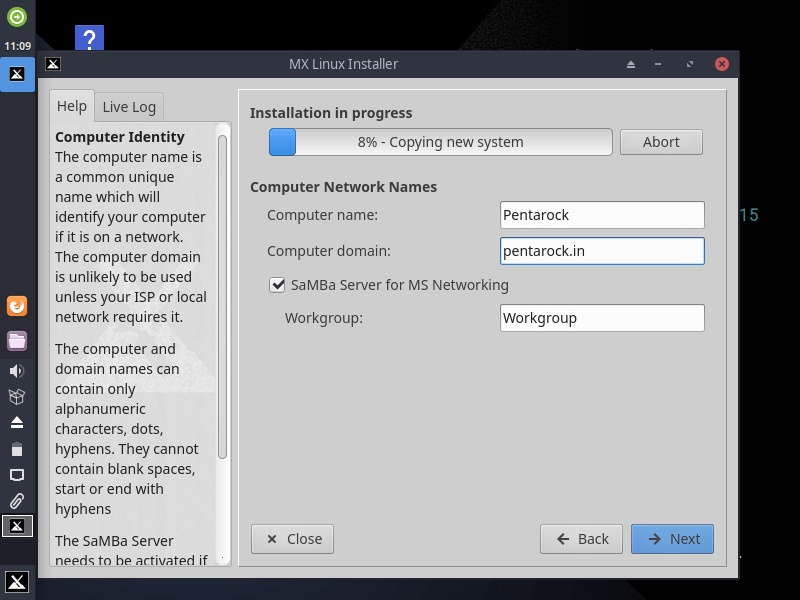
Furthermore, provide the computer name, computer domain and workgroup and click on the next button to move to the next screen as shown below.
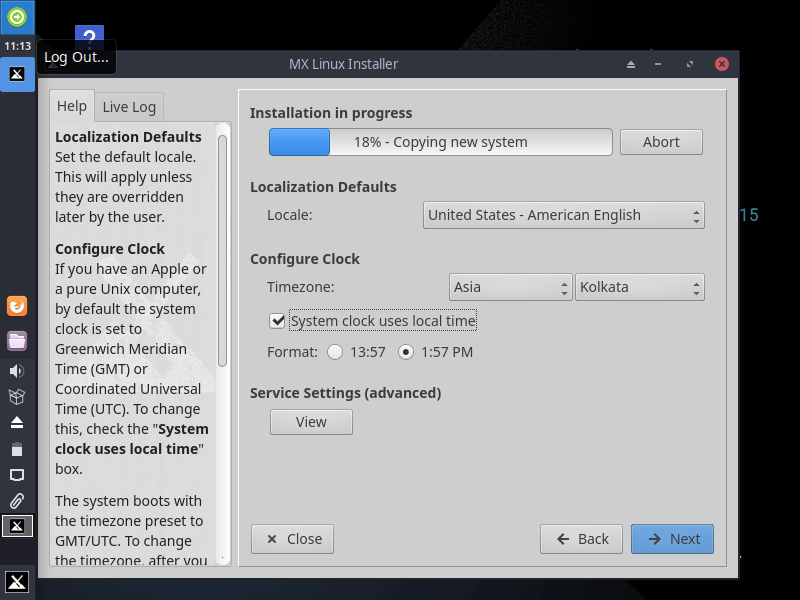
Select the system locale and time zone and click next to move to the next step. You can modify the system locale and time zone after the installation of MX Linux. Below given is the next screen.
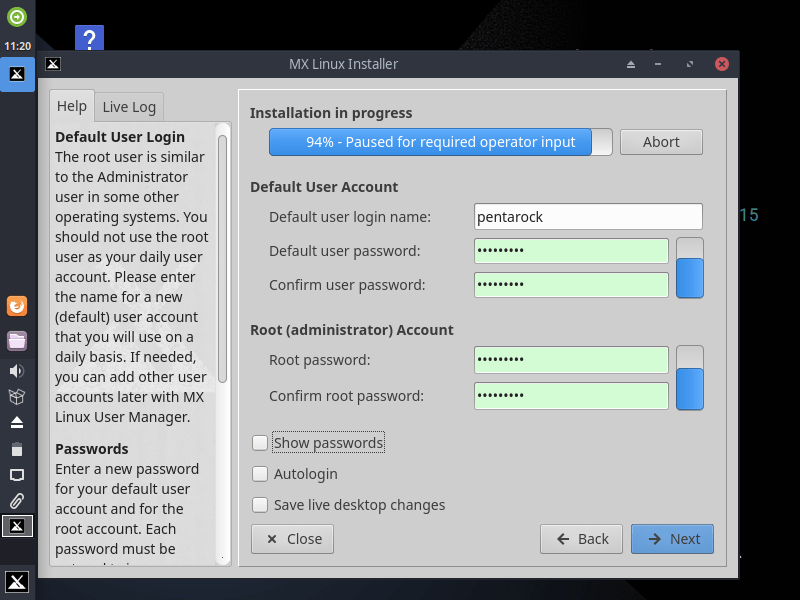
Here enter the default user name and password for default user and root account and click on the next button to proceed with the installation. The installation of MX Linux will continue for around 10 minutes. The installation time will largely depend on the configuration of your computer system. Below given screen is the finish installation screen.
Finishing the Installation
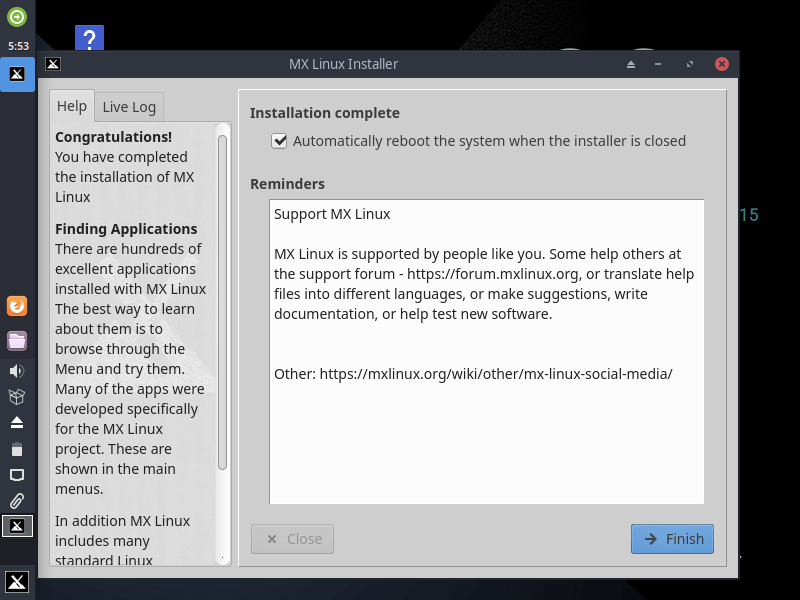
Now click on the finish button to complete the installation of MX Linux 19.4 on your system. Now your computer will restart and you will see the login screen of the MX Linux 19.4 as shown in the figure.
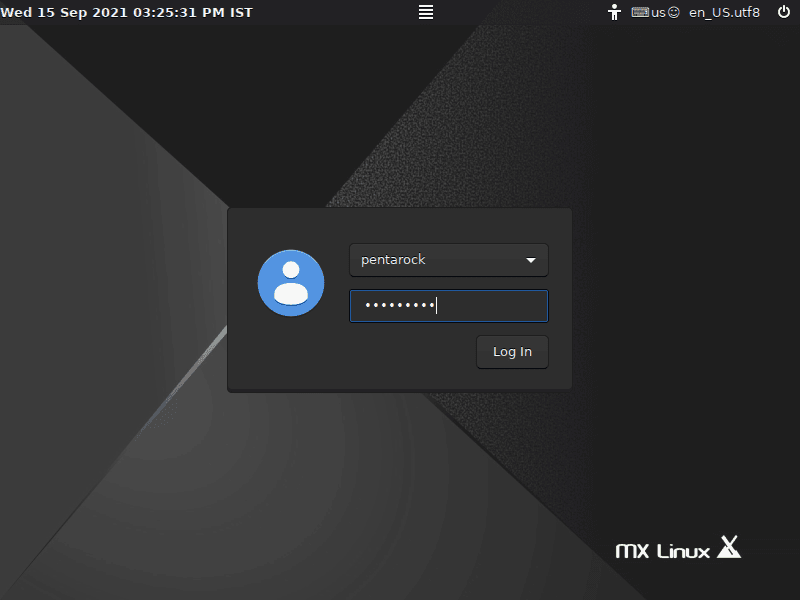
Enter the default user password and login to your new MX Linux system. Enjoy!

