How to Install phpMyAdmin on Debian 10 Buster
The phpMyAdmin was first released in 1998. Since then, it has become one of the most popular web frontend for MySQL / MariaDB Database Servers. It is simple and easy to use web frontend for MySQL / MariaDB. It is indeed very complex to use MySQL Database through command line. Therefore, many MySQL database users prefer phpMyAdmin as a web frontend to work on MySQL Databases. Here, we will see how to install phpMyAdmin on Debian 10 Buster.
Initially, MySQL was open source and free software. But later, it was acquired by Oracle Corporation. Oracle Corporation maintains two editions of MySQL Database Server. The first one is Enterprise Edition which is commercial edition. If required you can purchase it from Oracle Corporation. The other one is Community Edition which is free and open source.
Similarly there is MariaDB Database Server. It is also an open source alternative of MySQL Database Server. It was developed by the same team of developers who were involved in the development of MySQL Database Server. Here in this tutorial we will use MariaDB Database Server for testing and verifying our phpMyAdmin installation.
Prerequisites for installing phpMyAdmin on Debian 10 Buster
- First, we will need a system with preinstalled Debian 10 Server / Desktop operating system. If you want to fresh install Debian 10 Buster, you can follow the link given below:
| How to Install Debian 10 Buster |
- We will need root User Name and Password of Debian 10 for installation of related software applications and their dependencies.
- It is required that the Debian 10 system should have pre-installed LAMP Stack (Debian 10 Operating System, Apache Web Server, MariaDB Database Server and PHP). To install LAMP Stack on Debian 10 you can follow our tutorial, the link is given below:
| How to Install LAMP Stack on Debian 10 Buster |
- We will require a Stable internet connection for downloading and installing application and their dependencies.
MariaDB is a fork of MySQL Database Server and is developed by its community. The two applications are almost the same. But originally phpMyAdmin was developed for MySQL only. It is tested and found that phpMyAdmin works perfectly for MariaDB installation.
If you intend to install phpMyAdmin on a domain and for remote data access, make sure that you configure your domain with SSL/TLS certificate.
Update Debian 10 Buster
Before installing phpMyAdmin we must update the operating system. To update Debian 10, issue the following command in the terminal window:
sudo apt-get updatesudo apt-get upgradeAfter the execution of the above commands our system is now up to date.
Install Some Most Common PHP Extensions
The official document of phpMyAdmin recommends that some PHP extensions must be installed first before the installation of phpMyAdmin. These PHP extensions improve the performance of phpMyAdmin. These PHP extensions are php-mbstring, php-zip and php-gd. I recommend that we should install all the most common extensions of PHP. To install the most common extensions of PHP issue the following command in the terminal window:
sudo apt -y install php-cli php-fpm php-json php-pdo php-mysql php-zip php-gd php-mbstring php-curl php-xml php-pear php-bcmathAfter the installation of the most common extensions of PHP, now we are ready to install phpMyAdmin on our Debian 10 System.
Install phpMyAdmin on Debian 10 Buster
At the time of writing this tutorial, we found that phpMyAdmin in not available in the default repository of Debian 10 Buster. Therefore we have to download the source code of phpMyAdmin from the official website for the installation.
To download phpMyAdmin source code, go to the phpMyAdmin download page. The link to the download page is given below:
| Link to the Official Website of phpMyAdmin for Installer Download |
Now, scroll down on this page, and you will find download links for phpMyAdmin. You will notice that there are two versions of download. First for all-languages and the other one is for english-language only. Download the all-languages file as we will be installing for the all languages. Next, select the latest current version of phpMyAdmin (all-languages.tar.gz) file. Now right click on this tarball archive file download link and copy the link.
At the time of writing this article the latest version of phpMyAdmin is 5.1.1. Now download the file using the wget command. Now go to the /tmp folder and download the source code file issue the following command in the terminal window. Remember to change the link after the wget command to download the latest version of phpMyAdmin.
sudo cd /tmpsudo wget https://files.phpmyadmin.net/phpMyAdmin/5.1.1/phpMyAdmin-5.1.1-all-languages.tar.gzAfter downloading the tarball file to your local disk now is the time to extract the downloaded archive file for installation purpose.
To extract the tarball archive files on the disk issue the following command in the terminal window:
sudo tar xvf phpMyAdmin-5.1.1-all-languages.tar.gzThe above command will create folder phpMyAdmin-5.1.1-all-languages and extract all the files in this folder. Now rename this folder to phpMyAdmin. To do this issue the following command.
sudo mv phpMyAdmin-5.1.1-all-languages phpmyadminNow, move phpmyadmin folder inside the folder /usr/share, the default installation folder of phpmyadmin. To move phpmyadmin folder to /usr/share issue the following command in the terminal window:
sudo mv phpmyadmin /usr/shareAfter the execution of the above command the installation part of phpMyAdmin is complete. Now we have to configure our installation to be able to access phpMyAdmin through the web browser.
Configure phpMyAdmin on Debian 10 Buster
Now, follow the step by step configuration of phpMyAdmin on Debian 10.
Make a tmp folder inside phpmyadmin folder, where phpmyadmin will store its temporary files.
To create this tmp folder issue the following command in the terminal window:
sudo mkdir -p /var/lib/phpmyadmin/tmpChange the ownership of the folder and make apache user www-data owner. To do this, issue the following command in the terminal window:
sudo chown -R www-data:www-data /var/lib/phpmyadminThere is a sample phpMyAdmin configuration file in the earlier extracted file in the folder /usr/share/phpmyadmin. The name of the configuration file is config.sample.inc.php. Rename this file to config.inc.php in the same folder. To rename the configuration file, issue the following command in the terminal window:
sudo cp /usr/share/phpmyadmin/config.sample.inc.php /usr/share/phpmyadmin/config.inc.phpEdit phpMyAdmin Configuration File
Now open the file in your favorite text editor. We are using nano text editor.
sudo nano /usr/share/phpmyadmin/config.inc.phpNow, scroll down the file and search the line containing string $cfg[‘blowfish_secret’] in the file. This line will be like the shown below:
$cfg['blowfish_secret'] = ''; /* YOU MUST FILL IN THIS FOR COOKIE AUTH! */Now enter a string of 32 characters in between the quotes as secret passphrase as shown below. You do not have to remember this.
$cfg['blowfish_secret'] = 'abchgdnjsmJFKnHMJDggkenuenHJytDJ'; /* YOU MUST FILL IN THIS FOR COOKIE AUTH! */Now further scroll down in the file and search for the string “/* User used to manipulate with storage */” in the file and make the changes so that the lines in the file should look like similar to the given below.
| /* User used to manipulate with storage */ // $cfg[‘Servers’][$i][‘controlhost’] = ”; // $cfg[‘Servers’][$i][‘controlport’] = ”; $cfg[‘Servers’][$i][‘controluser’] = ‘pma’; $cfg[‘Servers’][$i][‘controlpass’] = ‘password’; |
Now the next section starts with the following line.
/* Storage database and tables */
Here, uncomment every line in this section by removing the slashes at the starting of the line so that it looks like the given below:
| /* Storage database and tables */ $cfg[‘Servers’][$i][‘pmadb’] = ‘phpmyadmin’; $cfg[‘Servers’][$i][‘bookmarktable’] = ‘pma__bookmark’; $cfg[‘Servers’][$i][‘relation’] = ‘pma__relation’; $cfg[‘Servers’][$i][‘table_info’] = ‘pma__table_info’; $cfg[‘Servers’][$i][‘table_coords’] = ‘pma__table_coords’; $cfg[‘Servers’][$i][‘pdf_pages’] = ‘pma__pdf_pages’; $cfg[‘Servers’][$i][‘column_info’] = ‘pma__column_info’; $cfg[‘Servers’][$i][‘history’] = ‘pma__history’; $cfg[‘Servers’][$i][‘table_uiprefs’] = ‘pma__table_uiprefs’; $cfg[‘Servers’][$i][‘tracking’] = ‘pma__tracking’; $cfg[‘Servers’][$i][‘userconfig’] = ‘pma__userconfig’; $cfg[‘Servers’][$i][‘recent’] = ‘pma__recent’; $cfg[‘Servers’][$i][‘favorite’] = ‘pma__favorite’; $cfg[‘Servers’][$i][‘users’] = ‘pma__users’; $cfg[‘Servers’][$i][‘usergroups’] = ‘pma__usergroups’; $cfg[‘Servers’][$i][‘navigationhiding’] = ‘pma__navigationhiding’; $cfg[‘Servers’][$i][‘savedsearches’] = ‘pma__savedsearches’; $cfg[‘Servers’][$i][‘central_columns’] = ‘pma__central_columns’; $cfg[‘Servers’][$i][‘designer_settings’] = ‘pma__designer_settings’; $cfg[‘Servers’][$i][‘export_templates’] = ‘pma__export_templates’; . . . |
Now navigate to the bottom of the file and add the following line at the end of the file.
$cfg['TempDir'] = '/var/lib/phpmyadmin/tmp';The above is the location of the tmp folder. Now save the file and exit the text editor.
Now we will create phpMyAdmin user and database. For this there is a sql folder in phpMyAdmin folder. In this folder there is a file named create_tables.sql. This create_tables.sql file contains all the required commands to create database and tables that enables phpMyAdmin to function properly.
Now, issue the following command in the terminal windows to create the configuration database and tables as shown below:
sudo mariadb < /usr/share/phpmyadmin/sql/create_tables.sql –u root -pNext, we need to create a phpmyadmin administrative user (pma user) . To create this user logon to the MariaDB Server and issue the following command.
sudo mariadb –u root -p
MariaDB [(none)]> GRANT SELECT, INSERT, UPDATE, DELETE ON phpmyadmin.* TO 'pma'@'localhost' IDENTIFIED BY 'password';
Configuration of phpMyAdmin is complete and now we will create apache configuration file for phpMyAdmin.
Configuring Apache Web Server
Now, we will create a file phpmyadmin.conf in the /etc/apache2/conf-available/ folder. To create this file use your favorite text editor. I am using nano.
sudo nano /etc/apache2/conf-available/phpmyadmin.confNow add the following content in the file.
# phpMyAdmin default Apache configuration
Alias /phpmyadmin /usr/share/phpmyadmin
<Directory /usr/share/phpmyadmin>
    Options SymLinksIfOwnerMatch
    DirectoryIndex index.php
    <IfModule mod_php5.c>
        <IfModule mod_mime.c>
            AddType application/x-httpd-php .php
        </IfModule>
        <FilesMatch ".+\.php$">
            SetHandler application/x-httpd-php
        </FilesMatch>
        php_value include_path .
        php_admin_value upload_tmp_dir /var/lib/phpmyadmin/tmp
        php_admin_value open_basedir /usr/share/phpmyadmin/:/etc/phpmyadmin/:/var/lib/phpmyadmin/:/usr/share/php/php-gettext/:/usr/share/php/php-php-gettext/:/usr/share/javascript/:/usr/share/php/tcpdf/:/usr/share/doc/phpmyadmin/:/usr/share/php/phpseclib/
        php_admin_value mbstring.func_overload 0
    </IfModule>
    <IfModule mod_php.c>
        <IfModule mod_mime.c>
            AddType application/x-httpd-php .php
        </IfModule>
        <FilesMatch ".+\.php$">
            SetHandler application/x-httpd-php
        </FilesMatch>
        php_value include_path .
        php_admin_value upload_tmp_dir /var/lib/phpmyadmin/tmp
        php_admin_value open_basedir /usr/share/phpmyadmin/:/etc/phpmyadmin/:/var/lib/phpmyadmin/:/usr/share/php/php-gettext/:/usr/share/php/php-php-gettext/:/usr/share/javascript/:/usr/share/php/tcpdf/:/usr/share/doc/phpmyadmin/:/usr/share/php/phpseclib/
        php_admin_value mbstring.func_overload 0
    </IfModule>
</Directory>
# Authorize for setup
<Directory /usr/share/phpmyadmin/setup>
    <IfModule mod_authz_core.c>
        <IfModule mod_authn_file.c>
            AuthType Basic
            AuthName "phpMyAdmin Setup"
            AuthUserFile /etc/phpmyadmin/htpasswd.setup
        </IfModule>
        Require valid-user
    </IfModule>
</Directory>
# Disallow web access to directories that don't need it
<Directory /usr/share/phpmyadmin/templates>
    Require all denied
</Directory>
<Directory /usr/share/phpmyadmin/libraries>
    Require all denied
</Directory>
<Directory /usr/share/phpmyadmin/setup/lib>
    Require all denied
</Directory>
Now, Save the file and exit the text editor.
Next enable the configuration file by issuing the following command.
sudo a2enconf phpmyadmin.confThen restart the apache2 service.
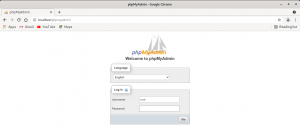
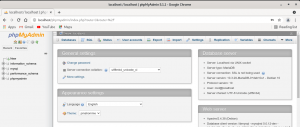
sudo systemctl reload apache2Now open the web browser and type the URL in the address bar of the web browser as shown below.
http://localhost/phpmyadminYou will get the phpMyAdmin page as shown below.
The installation of phpMyAdmin is complete and now we can use it for our day to day job.


