How to Install LAMP Stack on Debian 10

In this tutorial we will be looking at how to install LAMP Stack on Debian 10 Buster. LAMP is an acronym for:
- Linux Operating System
- Apache Web Server
- MySQL or MariaDB Database Server
- PHP, a server side scripting language
Here we will use Debian 10 Buster as our Linux Operating System. Our web server will be Apache2. We will use MariaDB as our Database Server. And off course PHP will be the programming language.
All the above mentioned applications that comprise our LAMP Stack are free and open source applications. Debian 10 Buster is also an open source and free operating system.
| Link to Official Website of Debian 10 Buster |
However, MySQL was developed by MySQLAB. It is an open source database server. It is based on relational database management system. The Oracle Corporation acquired MySQL in 2010. Oracle Corporation maintains two versions of the MySQL Database Server. One is Enterprise Server Edition and the other one is Community Server Edition. The Enterprise Server Edition is commercial edition. It can be purchased from Oracle Corporation. The community server edition is open source and free edition.
The LAMP Stack is one of the most popular software stacks among the developers. It is used by the developer to create dynamic websites and web applications. The software applications of LAMP Stack combined together are responsible for powering most of the dynamic websites today.
Prerequisites for Installing LAMP Stack on Debian 10 Buster
- We will require a system with preinstalled Debian 10 Server / Desktop operating System.
You can follow the link below to install Debian 10 Buster.How to Install Debian 10 Buster - We will need root user privileges for installing the LAMP applications on Debian 10. We can prefix sudo with each command or we can switch to root user using su- command.
- A stable and fast internet connection for downloading and installing the components of LAMP Stack and its dependencies.
Software Package Update on Debian 10 Buster
On the Debian 10 system, first update the repository and the software packages. For this, open the terminal window and issue the following command.
sudo apt-get updatesudo apt-get upgradeInstall Apache Web Server on Debian 10 Buster
Linux as Debian 10 operating system we already have on our machine. Now we need to install Apache Web Server. During the installation of the Apache Web Server, the installer will also install some other required applications and dependencies. We will also install apache utilities comprising some important utilities like user authentication management tool, Apache HTTP Server benchmarking tool etc.
To install Apache Web Server issue the following command in the terminal window.
sudo apt-get install apache2 apache2-utilsThe installer will prompt for our confirmation and on affirmative response the installation will proceed. The output of the above command will be similar to as given below:
| sudo apt-get install apache2 apache2-utils Reading package lists… Done Building dependency tree Reading state information… Done The following additional packages will be installed: apache2-data ssl-cert Suggested packages: apache2-doc apache2-suexec-pristine | apache2-suexec-custom openssl-blacklist The following NEW packages will be installed: apache2 apache2-data apache2-utils ssl-cert 0 upgraded, 4 newly installed, 0 to remove and 0 not upgraded. Need to get 675 kB of archives. After this operation, 2,052 kB of additional disk space will be used. Do you want to continue? [Y/n] Y Get:1 http://security.debian.org/debian-security buster/updates/main amd64 apache2-data all 2.4.38-3+deb10u5 [165 kB] ……………… ……………… |
After the completion of Apache web Server and Apache Web Server Utilities is Complete. The installer automatically starts the Web Server. Now it is time to verify the status of the Web Server. To check the current status of the Web Server issue the following command in the terminal window.
| Link to Official Website of Apache Web Server |
Test Status of Apache Web Server
sudo systemctl status apache2The output of the above command will be similar to as shown below:
| sudo systemctl status apache2 apache2.service – The Apache HTTP Server Loaded: loaded (/lib/systemd/system/apache2.service; enabled; vendor preset: Active: active (running) since Mon 2021-08-02 15:06:34 IST; 6min ago Docs: https://httpd.apache.org/docs/2.4/ Main PID: 3742 (apache2) Tasks: 55 (limit: 4669) Memory: 10.4M CGroup: /system.slice/apache2.service ├─3742 /usr/sbin/apache2 -k start ├─3744 /usr/sbin/apache2 -k start └─3745 /usr/sbin/apache2 -k start Aug 02 15:06:34 smtp systemd[1]: Starting The Apache HTTP Server… Aug 02 15:06:34 smtp systemd[1]: Started The Apache HTTP Server. lines 1-14/14 (END) |
The above status is showing that the Apache Web Server is up and running. Although if you have followed the tutorial. Then in your case also the web server will be up and running. However, if the Web Server is not running then issue the following command in the terminal window to start the Apache Web Server. Also enable the web server so that from the next system boot the server should start automatically.
sudo systemctl start apache2sudo systemctl enable apache2To check the installed version of Apache Web Server, issue the following command in the terminal window.
Check Apache Server Version
sudo apache2 -vThe output of the above command will be similar as shown below:
| sudo apache2 -v Server version: Apache/2.4.38 (Debian) Server built: 2021-06-10T10:13:06 |
Now if you have public IP address on your Debian 10 operating system, then open your favorite browser and type the public IP address in the address bar of the browser. You will see that the default page of Apache Web Server will be displayed. In case you do not have the public IP address on your Debian 10 system, then open the browser and type the following:
http://localhost or
http://127.0.0.1or
http://your-local IP addressThe out put on your browser will be shown as in the image given below:

If we have the Apache2 Debian default Page on our browser, then this indicates that our web server is installed and running properly.
If we are unable to connect to our web server then there might be a firewall that is preventing the connection to the web server. In this case you have to allow the port 80 in the firewall. If you are using the UFW firewall then issue the following command in the terminal window to open the port 80 in the UFW firewall.
sudo ufw allow httpBy default the owner of the document root folder also called the web root folder is the root user. The “/var/www/html /“is known as the document root folder. Now we must change the ownership of this folder to Apache User which is “www-data:www-data”. To change the ownership recursively, issue the following command in the terminal window.
sudo chown -R www-data:www-data /var/www/htmlNow, the Apache Web Server is installed successfully and is up and running.
Install MariaDB Server on Debian 10 Buster
Now, we will install the MariaDB Database Server and MariaDB Database Client packages using the same apt-get command of Debian 10 Operating System. This command will also pull the other dependency packages along with the database server and client packages. The following command will install the MariaDB Database Server and Client without any prompt and will set a blank password for the root user. It will also install and configure a test database along with system database. This will leave the default MariaDB database insecure.
| Link to Official Website of MariaDB Server |
sudo apt-get install mariadb-server mariadb-clientConfigure and Secure MariaDB Database Server
After the installation of MariaDB Server and Client is complete, we will run mysql_secure_installation script. Moreover, this script will be used to set the database root user password, remove test database, remove anonymous users and flush privileges. By using this script we will be able to restrict the access to the database and we will be able to secure our database server installation.
sudo mysql_secure_installationNow, the above script will prompt us a series of questions. Through our responses to these questions we will be able to change and make secure our MariaDB database server default installation.
The first prompt will be to enter the existing password of the MariaDB root User. If this is a fresh installation of the MariaDB Database Server, the root user’s password will be blank. Therefore we have to just press the enter key in response to the current password query. Below given are the full text of prompts for mysql_secure_installation script and the responses to be given.
| sudo mysql_secure_installation NOTE: RUNNING ALL PARTS OF THIS SCRIPT IS RECOMMENDED FOR ALL MariaDB SERVERS IN PRODUCTION USE! PLEASE READ EACH STEP CAREFULLY! In order to log into MariaDB to secure it, we’ll need the current password for the root user. If you’ve just installed MariaDB, and you haven’t set the root password yet, the password will be blank, so you should just press enter here. Enter current password for root (enter for none): OK, successfully used password, moving on… Setting the root password ensures that nobody can log into the MariaDB root user without the proper authorization. Set root password? [Y/n] Y New password: Re-enter new password: Password updated successfully! Reloading privilege tables.. … Success! |
By default, a MariaDB installation has an anonymous user, allowing anyone to log into MariaDB without having to have a user account created for them. This is intended only for testing, and to make the installation go a bit smoother. You should remove them before moving into a production environment. Remove anonymous users? [Y/n] Y … Success! Normally, root should only be allowed to connect from ‘localhost’. This ensures that someone cannot guess at the root password from the network. Disallow root login remotely? [Y/n] Y … Success! By default, MariaDB comes with a database named ‘test’ that anyone can access. This is also intended only for testing, and should be removed before moving into a production environment. Remove test database and access to it? [Y/n] Y – Dropping test database… … Success! – Removing privileges on test database… … Success! Reloading the privilege tables will ensure that all changes made so far will take effect immediately. Reload privilege tables now? [Y/n] Y … Success! Cleaning up… All done! If you’ve completed all of the above steps, your MariaDB installation should now be secure. Thanks for using MariaDB!
How to Change the Password Authentication Method in MariaDB
By default MariaDB use the UNIX socket plug-in to authenticate users.
Now, we will set the password authentication method in MariaDB Server to native. Later when we will install phpMyAdmin, this will enable us to connect as root user. Now, login in to the MariaDB Database Server as root user. Then, issue the following command in the terminal window step by step in the given order.
sudo mysql -u root -p [Run the Command]| Enter password: [Enter root User Password] |
The output of the above command will be similar to the shown below and we will get the MariaDB command prompt.
| Welcome to the MariaDB monitor. Commands end with; or \g. Your MariaDB connection id is 58 Server version: 10.3.29-MariaDB-0+deb10u1 Debian 10 Copyright (c) 2000, 2018, Oracle, MariaDB Corporation Ab and others. Type ‘help;’ or ‘\h’ for help. Type ‘\c’ to clear the current input statement. MariaDB [(none)]> [MariaDB Database Server Command Prompt] |
Run the given below SQL statement on the MariaDB Command Prompt.
MariaDB [(none)]> update mysql.user set plugin = 'mysql_native_password' where User = 'root';| Query OK, 1 row affected (0.000 sec) Rows matched: 1 Changed: 1 Warnings: 0 |
MariaDB [(none)]> flush privileges;| Query OK, 0 rows affected (0.000 sec) |
MariaDB [(none)]> quit| Bye |
Now, quit the MariaDB Database Server Command prompt by issuing the “quit” command. Now the installation part is complete.
Test Mariadb Server
Furthermore, this is the time for testing the newly installed MariaDB Database Server.
Now, this is the time to test the MariaDB database Server installation. Next, run the following command in the terminal window.
sudo systemctl status mariadbThe output of the command will be similar to given below.
| sudo systemctl status mariadb mariadb.service – MariaDB 10.3.29 database server Loaded: loaded (/lib/systemd/system/mariadb.service; enabled; vendor preset: enabled) Active: active (running) since Mon 2021-08-02 09:59:11 IST; 18min ago Docs: man:mysqld(8) https://mariadb.com/kb/en/library/systemd/ Main PID: 3406 (mysqld) Status: “Taking your SQL requests now…” Tasks: 30 (limit: 4669) Memory: 78.4M CGroup: /system.slice/mariadb.service └─3406 /usr/sbin/mysqld …………. |
How to Start, Stop and Restart MariaDB Database Server
To start, stop and restart MariaDB Database Server run the following command in the terminal as root.
sudo systemctl start mariadbsudo systemctl stop mariadbsudo systemctl restart mariadbThat’s all; now, we have successfully installed and configured the MariaDB Database Server and Client on Debian 10 Buster.
Install PHP 7.3 on Debian 10 Buster
At the time of writing this post the stable version of PHP in the Debian 10 repository was PHP 7.3. Therefore we will be installing PHP 7.3. To install PHP 7.3 from the Debian 10 repository, issue the following command in the terminal window.
sudo apt -y install php php-commonMoreover, PHP 7.3 will be installed on our system, after execution of the above command. Now we need the PHP extensions. The PHP extensions may be installed as and when needed. Here, we will install the most common and popular PHP extensions that are required for basic usage. To install the most popular PHP extensions issue the following command in the terminal window.
sudo apt -y install php-cli php-fpm php-json php-pdo php-mysql php-zip php-gd php-mbstring php-curl php-xml php-pear php-bcmathNow issue the following command in the terminal window to install libapache2-mod-php.
sudo apt -y install libapache2-mod-phpNow we have to enable the apache module if not already enabled. Then restart the Apache Web Server.
sudo a2enmod php7.3The output of the above command will be as given below:
| sudo a2enmod php7.3 Considering dependency mpm_prefork for php7.3: Considering conflict mpm_event for mpm_prefork: Considering conflict mpm_worker for mpm_prefork: Module mpm_prefork already enabled Considering conflict php5 for php7.3: Module php7.3 already enabled |
Now Restart the Apache Web Server by issuing the following command in the terminal window.
sudo systemctl restart apache2Now PHP 7.3 is successfully installed on our Debian 10 system. To check the version information of PHP issue the following command in the terminal window.
Check PHP Version
php --versionThe output of the above command will be similar to the given below:
| php –version PHP 7.3.29-1~deb10u1 (cli) (built: Jul 2 2021 04:04:33) ( NTS ) Copyright (c) 1997-2018 The PHP Group Zend Engine v3.3.29, Copyright (c) 1998-2018 Zend Technologies with Zend OPcache v7.3.29-1~deb10u1, Copyright (c) 1999-2018, by Zend Technologies |
Now to verify the PHP script with Apache Web Server we will create a file phpinfo.php in the document root folder (/var/www/html) using a text editor. Now create a file phpinfo.php using your favorite text editor. We are using nano text editor.
sudo nano /var/www/html/phpinfo.phpNow paste the following PHP code into this file.
<?php
phpinfo();
?>
Next Save the file and exit from the text editor.
Now Open your favorite browser. Type the following in the address bar of the browser:
https://pentarock.in/phpinfo.phpor
http://127.0.0.1/phpinfo.phpor
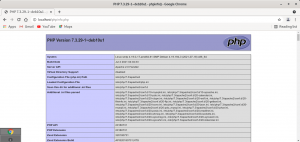
http://Your-Server-IPNow we will see our server’s PHP information page. This indicates that our installation is correct and successful. The displayed page on the server will be like the one given below:

Conclusion
This article will help us install LAMP Stack on Debian 10 Buster. We also have related article on LAMP Stack installation on Ubuntu 20.04. Below given is the link to the article.
| How to Install LAMP Stack on Ubuntu 20.04 |


